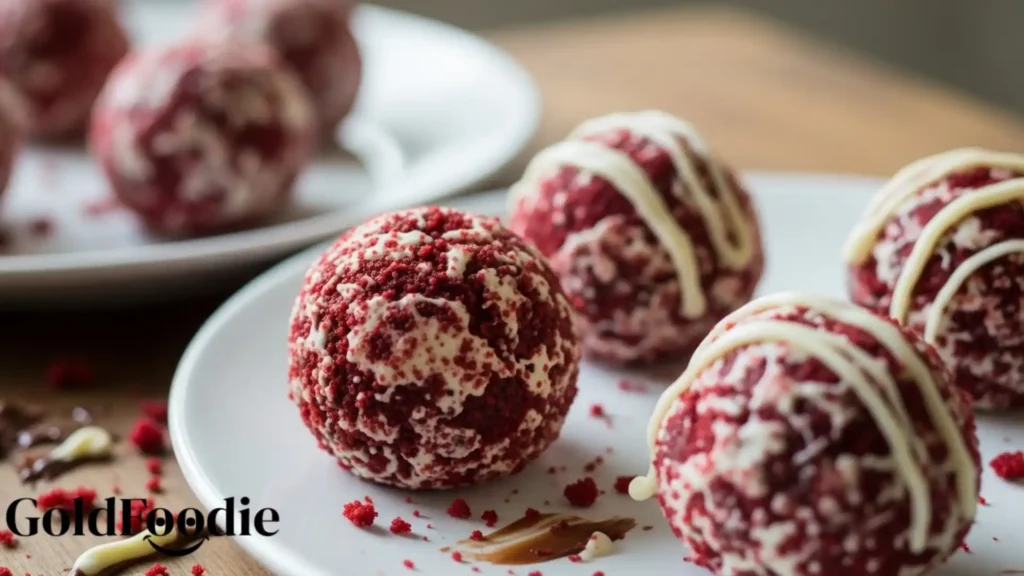
Imagine the rich, cocoa-kissed flavor of classic red velvet cake, transformed into a delightful, bite-sized treat. These Red Velvet Cake Truffles offer that iconic moist, velvety texture with a creamy frosting center, all enveloped in a delicate, perfectly sweet shell.
Perfect for satisfying sweet cravings without overindulging, my recipe brings you a simpler, more mindful approach to enjoying these decadent Red Velvet Cake Truffles. It’s an ideal solution for busy parents seeking a diabetes-friendly dessert that feels truly special, empowering you to make delicious, balanced choices for your family’s wellness journey.
Table of Contents
Why You’ll Love These Red Velvet Cake Truffles
- Mindful Indulgence: Enjoy the classic taste of Red Velvet Cake Truffles with conscious ingredient choices that support balanced blood sugar, turning a treat into a thoughtful choice.
- Effortlessly Delicious: Simple, straightforward steps mean you can create these impressive Red Velvet Cake Truffles even on your busiest days, making healthy baking accessible for everyone.
- Perfectly Portioned: Each truffle is a controlled, satisfying treat, making it ideal for managing intake and promoting sustainable wellness without sacrificing flavor.
- Family-Friendly Fun: A delightful dessert that everyone, including the kids, will adore, offering a healthier twist on a beloved classic without compromising on nutritional goals.

Ingredients You’ll Need
- For the Cake Base:
- 1 box Sugar-Free Red Velvet Cake Mix: Look for brands sweetened with erythritol or monk fruit to minimize sugar impact. This simplifies the process greatly.
- 1 cup Unsweetened Applesauce: A fantastic swap for oil, adding moisture and natural sweetness without excess fat.
- 2 large Eggs: Essential for structure and richness in our cake base.
- 1/2 cup Water or Unsweetened Almond Milk: To achieve the perfect batter consistency.
- For the Frosting Core:
- 4 oz Light Cream Cheese, softened: The tangy heart of our truffles. Opt for a reduced-fat version to keep things lighter.
- 1/4 cup Sugar-Free Powdered Sweetener: A blend like erythritol or stevia ensures sweetness without added sugars. Adjust to your taste.
- 1/2 teaspoon Vanilla Extract: Enhances the creamy flavor beautifully.
- For the Coating:
- 8 oz Sugar-Free White Chocolate Chips: Choose a high-quality brand that melts smoothly. This forms the delightful outer shell of your Red Velvet Cake Truffles.
- 1 teaspoon Coconut Oil: Helps the chocolate melt to a perfect dipping consistency, ensuring a smooth, even coating.
- Optional: Natural Red Food Coloring (powder or gel): If you want to enhance the vibrant red hue of your truffles, a few drops can make a big difference. Alternatively, a tiny amount of beet powder can provide a natural color boost.
- Optional Garnishes:
- Sugar-Free Sprinkles: For a festive touch.
- Unsweetened Cocoa Powder: A light dusting can add a sophisticated finish.

Substitutions & Variations
Adapting recipes to fit your unique needs is a cornerstone of sustainable wellness. These delightful Red Velvet Cake Truffles are incredibly versatile, allowing for several healthy swaps and creative variations. For a gluten-free cake base, consider using an almond flour or coconut flour blend in your homemade cake mix; remember to adjust liquid content carefully, as these flours absorb more moisture.
If you prefer a more intensely red hue for your Red Velvet Cake Truffles without artificial dyes, a small amount of beet powder or concentrated beet juice works wonderfully and adds a subtle earthy note.
For the coating, dipping your truffles in sugar-free dark chocolate instead of white chocolate provides a richer flavor and an antioxidant boost. You could also roll the finished truffles in finely chopped nuts like pistachios or walnuts for added healthy fats and texture, or even shredded unsweetened coconut for a tropical twist.
[ra_display_video url=”https://www.youtube.com/watch?v=2iRBCT5bGkA”]
For those who love creative variations, these delightful Red Velvet Cake Truffles can be adapted in many ways. If you’re inspired to try a new form of red velvet dessert, check out our recipe for Red Velvet Trifles.
Equipment You’ll Need
- Large Mixing Bowl
- Electric Mixer (handheld or stand mixer)
- Rubber Spatula
- Baking Sheet
- Parchment Paper
- Small Cookie Scoop (about 1 tablespoon size)
- Microwave-Safe Bowl or Double Boiler (for melting chocolate)
- Fork or Dipping Tools
Step-by-Step Instructions

- Bake the Cake: Prepare the sugar-free red velvet cake mix according to package directions, but substitute the oil with unsweetened applesauce. Use the eggs and water/almond milk as specified. Bake in a 9×13 inch pan until a toothpick inserted into the center comes out clean. Allow the cake to cool completely on a wire rack. This is crucial for the texture of your Red Velvet Cake Truffles.
- Crumble the Cake: Once the cake is fully cooled, gently crumble it into a large mixing bowl. You want fine crumbs, so use your hands to break down any larger pieces. This forms the moist base of your Red Velvet Cake Truffles.
- Prepare the Frosting: In a separate bowl, combine the softened light cream cheese, sugar-free powdered sweetener, and vanilla extract. Beat with an electric mixer until smooth and creamy. Taste and adjust sweetness if desired.
- Combine Cake and Frosting: Add the cream cheese frosting mixture to the crumbled cake. Using your hands (or a sturdy spatula), mix until thoroughly combined and a dough-like consistency forms. The mixture should be moist enough to hold together when pressed, but not overly sticky. This creates the perfect interior for your Red Velvet Cake Truffles.
- Roll the Truffles: Using a small cookie scoop (about 1 tablespoon), scoop out portions of the mixture. Roll each portion between your palms to form smooth, uniform balls. Place the rolled truffles on a baking sheet lined with parchment paper.
- Chill the Truffles: Place the baking sheet with the truffles in the refrigerator for at least 30 minutes, or in the freezer for 15 minutes. Chilling is essential to help the truffles firm up, making them easier to dip and ensuring they hold their shape perfectly for these Red Velvet Cake Truffles.
- Prepare the Coating: In a microwave-safe bowl, combine the sugar-free white chocolate chips and coconut oil. Microwave in 30-second intervals, stirring well after each, until the chocolate is fully melted and smooth. If adding natural red food coloring, stir it in now until you achieve your desired shade.
- Dip the Truffles: Using a fork or dipping tool, carefully dip each chilled truffle into the melted chocolate, ensuring it’s fully coated. Lift the truffle out, gently tap off any excess chocolate, and return it to the parchment-lined baking sheet. For a natural red color, you can add beet powder to the melted white chocolate or even sprinkle it on top.
- Decorate (Optional): If using sprinkles or cocoa powder, apply them immediately after dipping each truffle, before the chocolate sets. This creates beautiful and festive Red Velvet Cake Truffles.
- Set the Coating: Return the finished Red Velvet Cake Truffles to the refrigerator for another 15-30 minutes, or until the chocolate coating is completely set and firm.
Crumbling the cooled cake is crucial for achieving the perfect texture in your truffles. If you’re looking to broaden your dessert repertoire, don’t miss our sweet treat of Sugared Prosecco Grapes.
Pro Tips for Success

- Cool Cake Completely: Ensure your cake is absolutely cold before crumbling and mixing. Warm cake will result in a greasy, crumbly mixture that won’t hold its shape well. Patience here pays off for perfect Red Velvet Cake Truffles.
- Finely Crumble: The finer the cake crumbs, the smoother and more uniform the truffle texture will be. Avoid large chunks to prevent a lumpy final product.
- Chill Thoroughly: Don’t skimp on chilling time. Properly chilled truffles are much easier to roll and dip, minimizing mess and frustration. This also helps the Red Velvet Cake Truffles hold their shape beautifully.
- Work Quickly When Dipping: Melted chocolate can seize or thicken as it cools. If your chocolate starts to get too thick, gently reheat it for a few seconds in the microwave. Work in small batches if necessary.
- Tap Off Excess: After dipping, gently tap the fork or dipping tool against the side of the bowl to remove any excess chocolate. This prevents puddles at the base of your Red Velvet Cake Truffles and ensures a clean finish.
- Consider a Double Boiler: For ultra-smooth melting and better temperature control, use a double boiler for your chocolate. This prevents burning and keeps the chocolate at an ideal dipping consistency longer.
Storage & Reheating Tips
Proper storage is key to keeping your Red Velvet Cake Truffles fresh and delicious. Store them in an airtight container in the refrigerator for up to one week. The cool temperature helps maintain their firm texture and prevents the chocolate coating from melting.

For longer storage, you can freeze these delightful treats for up to one month. To freeze, arrange the truffles in a single layer on a parchment-lined baking sheet until solid, then transfer them to a freezer-safe bag or container, separating layers with parchment paper. When you’re ready to enjoy, simply thaw them in the refrigerator for a few hours before serving. These Red Velvet Cake Truffles are meant to be enjoyed chilled, so no reheating is necessary.
Storing your Red Velvet Cake Truffles properly will keep them delicious for longer and enhance your dessert experience. For a delightful twist on the classic cake, consider trying our Red Velvet Heart Cake.
What to Serve With This Recipe
These delightful Red Velvet Cake Truffles are a perfect standalone treat, but pairing them with complementary elements can elevate the experience while maintaining balance. Serve your Red Velvet Cake Truffles alongside a small bowl of fresh mixed berries for added antioxidants, natural sweetness, and fiber; raspberries, blueberries, and strawberries are fantastic choices.
A warm cup of herbal tea or a sugar-free latte makes a lovely accompaniment, turning a simple snack into a moment of mindful enjoyment. For a more substantial dessert experience, consider a dollop of plain Greek yogurt or a small fruit salad, which provides protein and additional nutrients to balance the sweetness of these exquisite Red Velvet Cake Truffles, ensuring a well-rounded and satisfying end to any meal or a delightful midday treat.
Frequently Asked Questions (FAQ)
Can I use a homemade cake for these Red Velvet Cake Truffles?
Absolutely! Using a homemade, low-sugar red velvet cake is a fantastic option. Just ensure the cake is completely cooled before crumbling.
If baking from scratch, consider using whole wheat pastry flour or an almond flour blend, and natural sweeteners like erythritol or monk fruit to keep the recipe diabetes-friendly. This can make your Red Velvet Cake Truffles even more customized to your health goals.
How can I achieve a vibrant red color naturally for my Red Velvet Cake Truffles?
For a beautiful, natural red hue, you have a few excellent options. Beetroot powder is a fantastic choice; just a small amount mixed into the cake batter or even dusted lightly on the white chocolate coating can provide a stunning color. You can also use concentrated beet juice or even a touch of cranberry concentrate. These natural alternatives ensure your Red Velvet Cake Truffles look as vibrant as they taste without relying on artificial dyes.
Are these Red Velvet Cake Truffles suitable for individuals managing diabetes?
Yes, with mindful ingredient choices and portion control, these Red Velvet Cake Truffles are designed to be a diabetes-friendly treat. By using sugar-free cake mix, sugar-free sweeteners in the frosting, and sugar-free chocolate for the coating, we significantly reduce the added sugar content. Always remember that portion control is key, and individual dietary needs may vary. Consult with your healthcare provider or a registered dietitian for personalized advice, but know that these Red Velvet Cake Truffles offer a balanced indulgence.
Red Velvet Cake Truffles are a beloved dessert bringing together the iconic flavor of classic red velvet cake in a bite-sized treat. These truffles represent a creative evolution of traditional recipes, showcasing their versatility and appeal in the world of confectionary delights, similar to what you can learn about the history of cakes.
Final Thoughts
Creating these Red Velvet Cake Truffles is more than just baking; it’s an act of self-care and a step towards sustainable wellness. I hope this recipe empowers you to enjoy life’s sweet moments with confidence and intention. Remember, healthy choices can be incredibly delicious.
Embrace the journey to better health, one mindful truffle at a time. You’ve got this!
Nutrition Information (per serving)
(Estimated per truffle, based on diabetes-friendly substitutions)
| Nutrient | Amount |
|---|---|
| Calories | ~120-150 kcal |
| Protein | ~3-5 g |
| Total Fat | ~8-10 g |
| Saturated Fat | ~5-7 g |
| Total Carbohydrates | ~10-15 g |
| Dietary Fiber | ~1-2 g |
| Sugar Alcohols | ~5-8 g (from sugar-free sweeteners) |
| Net Carbs | ~5-7 g |
| Added Sugars | ~0-1 g |

Red Velvet Cake Truffles
Ingredients
Method
- Bake the Sugar-Free Red Velvet Cake Mix as per the package directions, substituting oil with unsweetened applesauce and using eggs and water/almond milk as specified. Bake until a toothpick comes out clean and let it cool completely.
- Crumble the cooled cake into fine crumbs in a large mixing bowl.
- In another bowl, mix softened cream cheese, sugar-free powdered sweetener, and vanilla until creamy.
- Combine the cream cheese mixture with the crumbled cake, mixing until it forms a dough-like consistency.
- Scoop out portions of the mixture using a cookie scoop and roll them into balls.
- Chill the rolled truffles in the refrigerator for at least 30 minutes.
- Melt the sugar-free white chocolate chips and coconut oil in a microwave-safe bowl until smooth.
- Dip each chilled truffle into the melted chocolate, coating thoroughly, then return it to the parchment-lined baking sheet.
- If desired, sprinkle with garnishes immediately after dipping.
- Let the finished truffles set in the refrigerator until the chocolate is firm.
Notes

Diabetes Nutrition Specialist | Healthy Diet Advocate | Founder of GoldFoodie.
My passion for nutrition began with a deeply personal journey supporting my father through his battle with diabetes. Watching his daily struggles made me realize how powerful the right food choices can be in improving quality of life. That experience drove me to dedicate my career to helping others live healthier, more balanced lives.
- Rocco Fuhrman

- Rocco Fuhrman
- Rocco Fuhrman
- Rocco Fuhrman