Imagine biting into a burst of sunshine, a chewy, vibrant treat that instantly transports you to brighter days. This homemade Orange Jelly Candy isn’t just a sweet indulgence; it’s a little piece of joy, crafted with love and natural flavors. Get ready to discover the magic of making this delightful confection right in your own kitchen, a simple pleasure promising a tender texture and an intense citrus zing. This recipe for Orange Jelly Candy will quickly become a cherished favorite.
Table of Contents
Why You’ll Love This Orange Jelly Candy Recipe
This isn’t just any sweet treat; it’s a comforting confection that brings smiles and a touch of warmth to any day. Here’s why you’ll adore making this Orange Jelly Candy:
- You’ll experience an irresistible burst of fresh, tangy orange flavor in every single bite, far superior to anything store-bought.
- This recipe is surprisingly simple, transforming basic kitchen staples into an elegant, delightful candy with minimal effort.
- Crafting your own orange jelly candies means you control the ingredients, making it a wholesome and naturally vibrant alternative to artificial sweets.
- It’s a fantastic way to engage the family, creating cherished memories together as you mix, mold, and enjoy your homemade treats.

Ingredients You’ll Need
Like a treasured family heirloom, the heart of any beloved recipe lies in the quality of its components. For our delectable Orange Jelly Candy, selecting fresh, vibrant ingredients makes all the difference, ensuring each piece is a true delight.
- Fresh Orange Juice: Approximately 2 cups, freshly squeezed from ripe oranges. This provides the authentic, bright citrus flavor that truly makes our orange jelly candy shine. Avoid concentrate for the best results.
- Granulated Sugar: 3 cups, divided. This sweetens the candy and contributes to its firm, yet chewy, texture. You might adjust slightly based on your oranges’ sweetness.
- Unflavored Gelatin: 4 packets (about 1 ounce total). This is crucial for setting the jelly. Ensure it’s fresh for optimal gelling power.
- Pectin (optional, but recommended for firmer set): 1 tablespoon. If you desire a firmer, more traditional jelly candy texture, high-methoxyl pectin works beautifully.
- Lemon Juice: 1 tablespoon, freshly squeezed. A touch of lemon brightens and balances the orange flavor, adding a subtle tang that elevates the orange jelly candy.
- Orange Zest: 1 tablespoon, finely grated. This intensifies the orange aroma and flavor, adding depth that you simply cannot get otherwise. Use organic oranges if possible.
- Salt: A tiny pinch, about 1/8 teaspoon. Just a touch to enhance all the other flavors, making the orange notes even more pronounced.
- Powdered Sugar (for coating): Approximately 1/2 cup. This gives our finished Orange Jelly Candy a beautiful, non-sticky exterior and a classic confectionery appearance.

Substitutions & Variations
Every family recipe encourages a little personal touch, and our Orange Jelly Candy is no different. Feel free to explore these healthy and delightful variations to make this recipe truly your own, while still preserving its wholesome charm.
- Sweetener Swap: While granulated sugar is traditional, you can experiment with healthier alternatives. For a slightly different flavor profile and reduced refined sugar, consider using a high-quality maple syrup or agave nectar. Be aware that these might alter the final texture slightly, potentially requiring a bit more gelatin or pectin for a firm set.
- Citrus Medley: Don’t limit yourself to just oranges! Try a blend of citrus juices. Half orange and half grapefruit for a zesty, slightly bitter kick, or incorporate some lime juice for an extra layer of brightness. A mixed citrus jelly candy can be a delightful surprise.
- Spice Infusion: For an unexpected warmth, gently infuse your orange juice with a cinnamon stick, a few cloves, or a star anise while heating, then strain before adding gelatin. This creates a sophisticated, aromatic Orange Jelly Candy perfect for cooler months.
- Natural Color Boost: If you want to enhance the vibrant orange hue naturally, a tiny pinch of turmeric powder or a few drops of beet juice concentrate (which won’t affect flavor) can provide a beautiful color without artificial dyes.
- Reduced Sugar Option: For a less sweet version, you can slightly reduce the amount of granulated sugar, especially if your oranges are particularly sweet. Taste the mixture before adding the gelatin to find your perfect balance.
Note: This video is for demonstration purposes and may use a slightly different methode.
To enhance your Orange Jelly Candy experience, consider checking out Natural Orange Jelly. This recipe offers a healthier twist while maintaining the delightful flavors you love.
Equipment You’ll Need
Gathering your tools before you begin ensures a smooth and enjoyable candy-making experience. You won’t need anything fancy, just standard kitchen equipment to create your perfect Orange Jelly Candy.
- Medium Saucepan: For heating the orange juice mixture.
- Whisk: To thoroughly combine ingredients and prevent lumps.
- Rubber Spatula: For scraping the sides of the pan and folding.
- 8×8 inch Square Baking Pan: Or a similar-sized dish, essential for molding your jelly.
- Parchment Paper: To line the baking pan, making removal of the set jelly effortless.
- Measuring Cups and Spoons: For accurate ingredient measurements.
- Fine-Mesh Sieve: Optional, but useful for straining juice for a smoother jelly.
- Sharp Knife or Pizza Cutter: For cleanly cutting the set jelly into desired shapes.
- Small Mixing Bowls: For blooming gelatin and holding powdered sugar.
Step-by-Step Instructions
Creating this delightful Orange Jelly Candy is a journey, a labor of love that yields the most satisfying rewards. Follow these steps carefully, and soon you’ll be enjoying your own homemade confection, a true testament to the joy of making something special from scratch.

- Prepare Your Pan: First, gently line your 8×8 inch square baking pan with parchment paper, allowing an overhang on the sides. This thoughtful step will make removing your set Orange Jelly Candy a breeze later on. Lightly grease the parchment paper with a neutral oil or cooking spray.
- Bloom the Gelatin: In a small bowl, sprinkle the unflavored gelatin powder over 1/2 cup of the fresh orange juice. Stir gently and allow it to sit for 5-10 minutes, or until the gelatin has “bloomed” and become thick and spongy. This crucial step ensures a smooth texture in your finished candy.
- Combine Ingredients: In your medium saucepan, combine the remaining 1 1/2 cups of fresh orange juice, 2 cups of granulated sugar, the pectin (if using), lemon juice, orange zest, and salt. Whisk everything together thoroughly.
- Heat the Mixture: Place the saucepan over medium heat. Bring the mixture to a gentle boil, stirring constantly to ensure the sugar fully dissolves. Once it begins to boil, let it simmer for about 5 minutes, continuing to stir. This helps to develop the flavor and activate the pectin.
- Incorporate Gelatin: Remove the saucepan from the heat. Add the bloomed gelatin mixture to the hot orange liquid. Whisk vigorously until the gelatin is completely dissolved and no lumps remain. The warmth of the liquid will melt the gelatin, creating the foundation for your Orange Jelly Candy.
- Pour and Chill: Carefully pour the warm liquid into your prepared baking pan. Gently tap the pan on the counter a few times to release any air bubbles. Allow it to cool to room temperature on the counter for about 30 minutes, then transfer it to the refrigerator. Chill for at least 4 hours, or preferably overnight, until the orange jelly candy is completely firm and set.
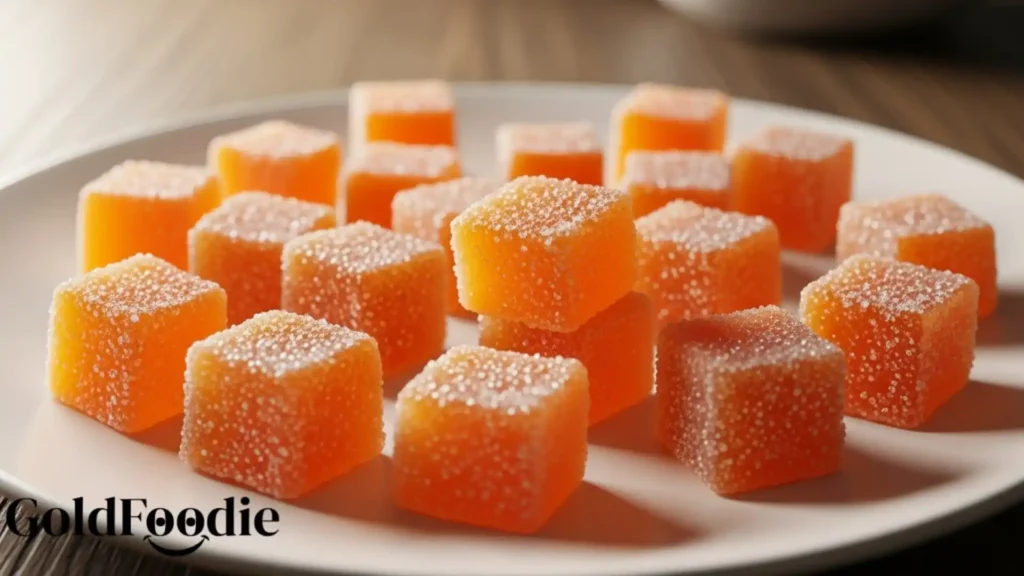
- Cut the Candies: Once fully set, use the parchment paper overhangs to carefully lift the solid Orange Jelly Candy out of the pan and onto a clean cutting board. Using a sharp knife or a pizza cutter, slice the jelly into 1-inch squares or desired shapes. You can wipe your knife with a damp cloth between cuts for cleaner edges.
- Coat and Serve: Place the powdered sugar in a shallow dish. Gently toss each piece of Orange Jelly Candy in the powdered sugar, ensuring it’s evenly coated on all sides. This prevents sticking and gives them their classic finish. Shake off any excess sugar. Your beautiful homemade Orange Jelly Candy is now ready to enjoy!
As you savor the process of making your Orange Jelly Candy, you may want to explore more about Orange Flavoured Jelly. This link provides additional insights and variations that can elevate your sweet creations.
Pro Tips for Success
Achieving that perfect, tender chewiness in your Orange Jelly Candy comes down to a few expert touches. These insights, gleaned from years of kitchen adventures, will ensure your candies are nothing short of spectacular.

- Accurate Temperature Control: When heating the orange mixture, pay close attention to the boil. A gentle simmer is ideal; too high heat can affect the pectin’s setting ability or even degrade the gelatin. Aim for a consistent, light boil to ensure proper activation.
- Don’t Rush the Bloom: Blooming gelatin is not merely an optional step; it’s essential. Rushing this process can lead to grainy textures or uneven setting in your Orange Jelly Candy. Give it the full 5-10 minutes.
- Use Fresh Citrus: The difference between fresh orange juice and store-bought concentrate is immense. Freshly squeezed juice provides a brighter, more authentic flavor profile that truly elevates the taste of your homemade Orange Jelly Candy.
- Grease Your Parchment: Even with parchment paper, a light greasing prevents any potential sticking, making the release of the set jelly effortless and preserving the perfect shape of your candies.
- Chill Thoroughly: Patience is a virtue in candy making. Do not skimp on chilling time. A fully firm and cold block of jelly will cut cleanly and hold its shape beautifully, giving you perfectly formed pieces of Orange Jelly Candy.
- Clean Cuts: For neat, professional-looking squares, use a very sharp knife or a pizza cutter. Wiping the blade with a damp cloth or rinsing it briefly between cuts can prevent sticking and ensure crisp edges.
- Even Coating: When tossing the candies in powdered sugar, do so gently and ensure each side is well-coated. This not only adds to the presentation but also helps prevent the candies from sticking together during storage.
Storage & Reheating Tips
To keep your delightful Orange Jelly Candy fresh and enjoyable for as long as possible, proper storage is key. Fortunately, these candies are quite robust and easy to store, ready for whenever a sweet craving strikes.

- Airtight Container: Store the finished, powdered-sugar-coated Orange Jelly Candy in an airtight container at room temperature. Layering them with parchment paper can prevent sticking, especially in humid climates.
- Shelf Life: When stored correctly, these homemade candies typically remain fresh and delicious for up to 1-2 weeks. Beyond that, while still safe to eat, their texture might start to change slightly.
- Refrigeration (Optional): If you prefer a firmer candy or live in a very warm, humid environment, you can store them in the refrigerator. However, bring them back to room temperature for about 15-20 minutes before serving to soften them slightly and enhance their flavor.
- Freezing (Not Recommended): Freezing is generally not recommended for this type of jelly candy. The texture can become grainy or watery upon thawing, compromising the delightful chewiness you worked so hard to achieve.
To ensure your Orange Jelly Candy stays fresh and delectable, refer to our recommendations in Orange Jelly. Proper storage techniques can help maintain its delightful texture and flavor.
What to Serve With This Recipe
While this vibrant Orange Jelly Candy is a delightful treat on its own, it also pairs beautifully with other wholesome offerings. These pairings enhance the experience, creating a balanced and refreshing spread that honors the natural goodness of the candies.
- Fresh Fruit Platter: Complement the intense orange flavor with a platter of mixed fresh fruits like berries, melon, and grapes. The natural sweetness and varied textures offer a beautiful contrast.
- Herbal Tea: Serve these candies alongside a warm cup of herbal tea, such as chamomile, peppermint, or ginger. The gentle warmth and subtle flavors of the tea provide a lovely counterpoint to the sweet citrus.
- Light Yogurt Parfait: Create a simple parfait with plain Greek yogurt, a drizzle of honey, and a few pieces of chopped Orange Jelly Candy for a delightful breakfast or snack.
- Sparkling Water with Mint: For a refreshing experience, offer sparkling water infused with fresh mint leaves and a slice of orange. The effervescence and minty freshness cleanse the palate between bites of candy.
- Homemade Granola: A bowl of crunchy, homemade granola with a few pieces of orange jelly candy folded in adds a chewy, sweet surprise to your morning or afternoon snack.
- Cheese and Nut Board: For a more sophisticated pairing, consider a small cheese board with mild, creamy cheeses, a handful of unsalted nuts, and your vibrant Orange Jelly Candy for a sweet finish.
Frequently Asked Questions (FAQ)
Can I use fresh orange juice concentrate for this Orange Jelly Candy recipe?
While technically possible, I strongly recommend using freshly squeezed orange juice for this Orange Jelly Candy. Fresh juice provides a much brighter, more authentic, and vibrant citrus flavor that simply cannot be replicated by concentrate. The quality of your ingredients truly shines through in this simple confection, making the effort of squeezing fresh oranges well worth it for the superior taste and aroma.
How do I prevent my Orange Jelly Candy from sticking together?
The key to preventing your homemade Orange Jelly Candy from sticking is a generous and even coating of powdered sugar. Ensure each piece is thoroughly tossed in the powdered sugar, covering all sides. You can also store the candies in an airtight container with layers of parchment paper between them, especially if you live in a humid environment. This will help them maintain their individual shape and prevent clumping.
Is this Orange Jelly Candy recipe vegan?
As written, this Orange Jelly Candy recipe is not vegan because it uses traditional unflavored gelatin, which is an animal-derived product. However, you can easily adapt this recipe to be vegan by substituting the gelatin with agar-agar powder. Use about 2-3 teaspoons of agar-agar powder for every 4 packets of gelatin, but always check the specific brand’s instructions as gelling power can vary. Agar-agar will provide a similar, firm jelly-like texture.
Orange Jelly Candy is a delightful treat that combines the refreshing taste of oranges with a chewy texture, offering a homemade alternative to mass-produced sweets. Explore the fascinating history of jelly candies and their evolution in the confectionery world through this Candy link.
Final Thoughts
Making this vibrant Orange Jelly Candy is more than just a recipe; it’s an invitation to create warmth, share laughter, and infuse your home with the sweet scent of cherished memories. Every piece holds a sprinkle of our shared history, a sweet promise of moments to come, connecting us to the simple, profound joy of homemade treats.
Nutrition Information (per serving)
Please note that these values are estimates and can vary based on specific ingredients and preparation methods for your Orange Jelly Candy.
| Nutrient | Amount |
|---|---|
| Calories | Approximately 70-80 kcal |
| Total Fat | 0 g |
| Saturated Fat | 0 g |
| Cholesterol | 0 mg |
| Sodium | 5 mg |
| Total Carbohydrates | 18-20 g |
| Dietary Fiber | 0 g |
| Total Sugars | 16-18 g |
| Protein | 1-2 g |
| Vitamin C | 10-15% DV |

Orange Jelly Candy
Ingredients
Method
- Line an 8×8 inch baking pan with parchment paper and lightly grease it.
- In a small bowl, bloom the gelatin by sprinkling it over 1/2 cup of the orange juice and letting it sit for 5-10 minutes.
- In a medium saucepan, combine the remaining 1 1/2 cups orange juice, 2 cups sugar, pectin (if using), lemon juice, orange zest, and salt. Whisk thoroughly.
- Heat the mixture over medium heat until it gently boils, stirring constantly for about 5 minutes.
- Remove from heat and add the bloomed gelatin, whisking until dissolved.
- Pour the mixture into the prepared pan, tapping to release air bubbles. Let it cool for 30 minutes then chill in the refrigerator for at least 4 hours.
- Once set, lift the jelly out using the parchment paper, and cut into desired shapes.
- Coat in powdered sugar before serving to prevent sticking.
Notes

Hi there, I’m chef living in New York City. Every morning, I wake up to the sounds of my little one’s laughter and the comforting routine of preparing breakfast for my family my husband, our child, and my beloved mother, who’s become both my rock and my inspiration since my father passed away. As the only daughter left in our family, I feel a deep responsibility to carry on his memory whenever I step into the kitchen.
- Dominique

- Dominique
- Dominique
- Dominique