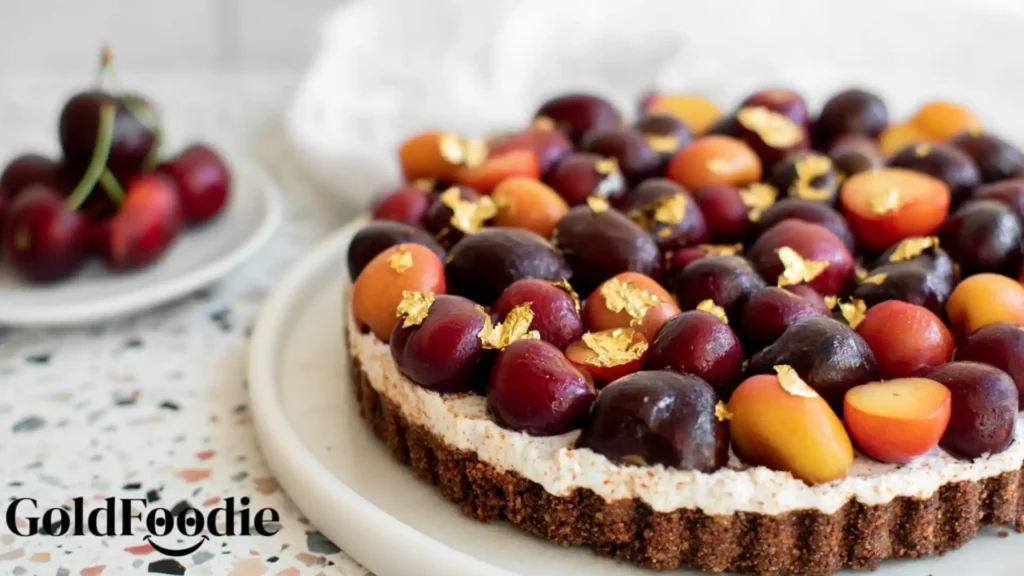
Welcome to a dessert that promises to delight your senses and create cherished family memories! This Cherry Pistachio Cheesecake recipe combines the luxurious creaminess of cheesecake with vibrant, unexpected flavors. Get ready to explore the delightful blend of a chocolate pistachio crust and a velvety, tart cherry-infused filling. You’ll learn how to create this stunning, easy-to-make dessert, perfect for any gathering or a special treat at home. It’s a dish that truly connects us through the joy of simple cooking.
Table of Contents
Why You’ll Love This Cherry Pistachio Cheesecake
- Unique Flavor: Experience a harmonious blend of rich chocolate, earthy pistachio, and bright, tart cherry in every bite.
- Stunning Presentation: Impress your guests with the vibrant colors and elegant design of this beautiful dessert, a true showstopper.
- Perfect for Summer: Enjoy a light, refreshing, and creamy dessert that cools you down on warm days, though it’s lovely year-round.
- Easier Than It Looks: Simple, step-by-step instructions ensure you can create a bakery-worthy treat without culinary stress.
- Customizable: Easily adapt this delightful Cherry Pistachio Cheesecake for nut-free or eggless dietary needs, ensuring everyone can enjoy.

Ingredients
Creating this beautiful Cherry Pistachio Cheesecake begins with selecting the finest ingredients. Each component plays a vital role in building its incredible flavor and texture, from the rich crust to the creamy filling.
For the Chocolate Pistachio Graham Cracker Crust:
- 1 ½ cups (140g) graham cracker crumbs
- ½ cup (64g) ground pistachio*
- ¼ cup (47g) granulated sugar
- 2 ½ tbsp (14g) unsweetened cocoa powder
- ¼ tsp salt
- 6 tbsp (85g) unsalted butter, melted
For the Cheesecake Filling:
- 16 oz (2 packages) cream cheese, room temperature
- ¼ cup (47g) sour cream
- ¼ cup (56g) mascarpone cheese
- ¾ cup (150g) granulated sugar
- 1 ½ tsp vanilla paste or extract
- 1 egg, room temperature (for eggless, mix 1 tbsp cornstarch with 1 ½ tbsp milk)
- ½ tsp salt
- 2 cups cherries, pitted and halved
Notes & Substitutions
- Pistachios: For a nut-free option, simply substitute the ground pistachios with an equal amount of extra graham cracker crumbs.
- Cherries: Fresh Rainer or Black cherries are wonderful, but you can also use a warm frozen cherry compote for an equally delicious topping.
- Eggless Option: Replace the egg with the cornstarch-milk slurry as indicated. It works beautifully to thicken the cheesecake.
- Temperature: Ensure all dairy ingredients for the filling are at room temperature. This is crucial for a smooth, lump-free batter and helps prevent cracks.
Equipment
Gathering your tools before you begin makes the baking process so smoother and more enjoyable. These essential items will help you achieve the perfect Cherry Pistachio Cheesecake.
- 9-inch tart pan or springform pan
- Mixing bowls (large and small)
- Hand mixer or stand mixer (with paddle attachment)
- Measuring cups and spoons
- Whisk
- Spatula
- Cherry pitter (highly recommended for efficiency)
How To Make Cherry Pistachio Cheesecake
Creating this Cherry Pistachio Cheesecake is a delightful journey of simple steps. Take your time, enjoy the process, and soon you’ll have a stunning dessert ready to share.
Chocolate Pistachio Crust
- Combine Dry Ingredients: In a mixing bowl, whisk together 1 ½ cups (140g) graham cracker crumbs, ½ cup (64g) ground pistachio, ¼ cup (47g) granulated sugar, 2 ½ tbsp (14g) unsweetened cocoa powder, and ¼ tsp salt until thoroughly combined.
- Add Butter: Pour in 6 tbsp (85g) melted unsalted butter and mix well until the mixture resembles wet sand and holds together when pressed.
- Press Crust: Transfer the mixture into a 9-inch tart pan or springform pan. Use your hands or the bottom of a measuring cup to press it evenly into the bottom and up the sides of the pan. Set the crust aside.
Cheesecake Filling
- Preheat Oven: Preheat your oven to 325°F (162°C).
- Beat Cream Cheese: In a large mixing bowl, add 16 oz (2 packages) room temperature cream cheese. Use a hand mixer or a stand mixer with a paddle attachment to beat the cream cheese until it is perfectly smooth and creamy.
- Combine Dairy & Sugar: Add ¼ cup (47g) sour cream, ¼ cup (56g) mascarpone cheese, and ¾ cup (150g) granulated sugar to the cream cheese mixture. Mix gently for about 1 minute, just until well combined. Avoid overmixing.
- Incorporate Egg & Flavor: Add 1 room temperature egg (or the cornstarch-milk slurry if making it eggless), 1 ½ tsp vanilla paste or extract, and ½ tsp salt. Mix on low speed until all ingredients are just incorporated. Be careful not to incorporate too much air.
- Pour Filling: Carefully pour the smooth cheesecake mixture into the prepared chocolate pistachio graham cracker crust.
- Smooth Top: Use a spoon or a spatula to spread the filling into an even layer, ensuring it fills the crust beautifully.
Baking & Cooling
- Bake Cheesecake: Place the cheesecake in the preheated oven and bake for 30-40 minutes.
- Check Doneness: The cheesecake is ready when the edges are set and appear slightly firm, but the center still has a slight, gentle jiggle when the pan is carefully shaken.
- Cool Completely: Remove the cheesecake from the oven and let it cool completely on a wire rack at room temperature. This gradual cooling helps prevent cracks.
- Chill Thoroughly: Once cooled to room temperature, transfer the cheesecake to the refrigerator and chill for a minimum of 2-3 hours. For the best texture and slice, overnight chilling is ideal.
- Decorate & Serve: Just before serving, decoratively top the chilled Cherry Pistachio Cheesecake with the fresh, pitted, and halved cherry halves. I love using a mix of Rainer and Black cherries for visual appeal!

Pro Tips for the Best Cherry Pistachio Cheesecake
Achieving a flawless, creamy Cherry Pistachio Cheesecake is easier with a few simple techniques. These tips will help you create a dessert that tastes as wonderful as it looks.
- Room Temperature Ingredients: Always ensure your cream cheese, sour cream, and mascarpone are at true room temperature. This is crucial for a smooth, lump-free cheesecake batter that blends effortlessly.
- Do Not Overmix: Overmixing incorporates too much air into the batter, which can cause your cheesecake to puff up and then crack as it cools. Mix only until ingredients are just combined.
- Gentle Mixing: Use a low speed on your mixer and stop as soon as the batter is uniform. Patience here yields the best results.
- Perfect Bake: Bake until the edges are set but the very center still has a slight jiggle. This indicates it’s cooked through but remains incredibly creamy.
- Gradual Cooling: Resist the urge to rush the cooling process. Allow the cheesecake to cool completely on the counter before chilling it in the refrigerator. Sudden temperature changes can lead to cracks.
- Cherry Prep: Invest in a cherry pitter; it’s a game-changer for speed and ease. Then, carefully halve your fresh cherries for an elegant topping.
- Crust Firmness: While you’re preparing the filling, chill the pressed crust briefly. This helps it set and prevents crumbling.
According to culinary science, understanding the causes of cheesecake cracks can help bakers avoid common issues like overmixing or rapid cooling.

Serving, Storage & Variations
This Cherry Pistachio Cheesecake is a joy to share and surprisingly versatile. Here are some ideas to make the most of your delicious creation.
- Serving Suggestions: Serve this delightful dessert chilled, garnished with extra fresh cherries for a burst of color and flavor. A small sprig of fresh mint can also add an elegant touch.
- Storage: Store any leftover cheesecake tightly covered in the refrigerator. It will stay fresh and delicious for up to 3-4 days, perfect for enjoying throughout the week.
- Freezing: For longer storage, you can freeze individual slices or the whole cheesecake (without the fresh cherry topping) for up to 1 month. Wrap it securely in plastic wrap and then foil. Thaw it slowly in the refrigerator overnight before serving.
- Nut-Free Crust: Easily make a nut-free version by using 2 cups of graham cracker crumbs instead of the ground pistachios. The chocolate notes will still shine through.
- Cherry Compote: For a warm, rich topping, simmer 1 cup of frozen cherries with a splash of lemon juice and a tablespoon of sugar until thickened. It adds a lovely depth of flavor.
- Citrus Zest: For a brighter, more zesty flavor profile, add 1-2 teaspoons of finely grated lemon or orange zest to the cheesecake filling.
- Chocolate Drizzle: Before serving, drizzle your chilled cheesecake with a little melted dark chocolate for an extra layer of decadence and visual appeal.

Nutrition Information
Making informed choices about the food we enjoy is part of our journey in the kitchen. Here’s an estimated nutritional breakdown for a serving of this Cherry Pistachio Cheesecake.
This estimated nutrition information is per serving and is provided for informational purposes only. It will vary based on exact ingredients and portion sizes used.
| Nutrient | Amount |
|---|---|
| Calories | 480-550 |
| Total Fat | 35-40g |
| Saturated Fat | 18-22g |
| Cholesterol | 110-130mg |
| Sodium | 250-280mg |
| Total Carbohydrates | 35-40g |
| Dietary Fiber | 2-3g |
| Total Sugars | 25-30g |
| Protein | 8-10g |
Beyond their delicious taste, studies indicate that cherries offer various health benefits, being rich in antioxidants and potentially aiding in inflammation reduction and sleep quality improvement.
Please note: These are estimated values and may vary based on specific brands and preparations. A detailed nutrition label will appear here from Nutrifox or a similar plugin in the final recipe card.
Frequently Asked Questions (FAQ)
Here are answers to some common questions you might have about making this delightful Cherry Pistachio Cheesecake.
Can I make this cheesecake ahead of time?
Yes, in fact, making it a day in advance is ideal. It allows for proper chilling, which enhances both the flavor and texture.
Why did my cheesecake crack?
Cracks can occur from overmixing the batter, baking at too high a temperature, or cooling the cheesecake too rapidly. Follow the pro tips for a smoother top.
Can I use a springform pan instead of a tart pan?
Absolutely, a 9-inch springform pan works perfectly for this recipe and makes for easy release.
What’s the best way to pit cherries?
A dedicated cherry pitter makes quick work of pitting multiple cherries efficiently and cleanly. It’s a worthwhile investment.
Is this recipe genuinely eggless?
Yes, the recipe provides a reliable cornstarch-milk slurry substitution for the egg, ensuring a similar texture and stability.
Final Thoughts
This Cherry Pistachio Cheesecake is more than just a dessert; it’s an invitation to gather, share, and create lasting memories around the table. With its rich chocolate pistachio crust and velvety cherry-topped filling, it’s a treat that looks incredibly impressive yet is wonderfully simple to achieve, making it a perfect project for any home cook.
We hope you feel encouraged to try this recipe, infusing your kitchen with joy and comfort. Give it a try, savor each bite, and most importantly, share your creations with those you love—you’re sure to delight everyone!

Cherry Pistachio Cheesecake
Ingredients
Equipment
Method
- Whisk graham cracker crumbs, ground pistachio, sugar, cocoa powder, and salt in a bowl. Add melted butter and mix until it resembles wet sand.
- Press the crust mixture evenly into a 9-inch tart or cake pan and set aside.
- Preheat your oven to 325°F (162°C).
- Beat cream cheese until smooth, then add sour cream, mascarpone, and sugar, mixing for one minute. Finally, incorporate the egg, vanilla, and salt until just combined.
- Pour the cheesecake filling into the prepared crust and spread it into an even layer using a spoon or spatula.
- Bake for 30-40 minutes until set with a slight jiggle in the center. Cool completely, then refrigerate for 2-3 hours before decorating with cherry halves and serving.
Notes

Hi there, I’m chef living in New York City. Every morning, I wake up to the sounds of my little one’s laughter and the comforting routine of preparing breakfast for my family my husband, our child, and my beloved mother, who’s become both my rock and my inspiration since my father passed away. As the only daughter left in our family, I feel a deep responsibility to carry on his memory whenever I step into the kitchen.
- Dominique

- Dominique
- Dominique
- Dominique