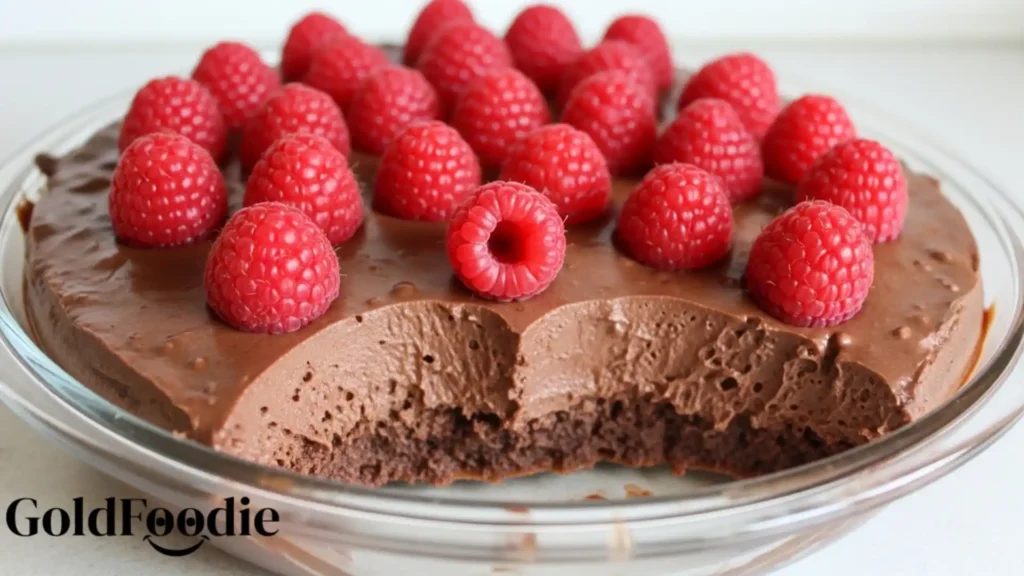
As a busy parent, finding a dessert that satisfies a sweet craving without derailing health goals can feel like a quest. You want something simple, yet elegant, and most importantly, kind to your blood sugar. Imagine a treat where vibrant raspberries meet rich chocolate, all suspended in a wonderfully smooth, jiggly texture.
This is exactly what our Raspberry-Chocolate Gelatin offers. It’s a delightful, diabetes-friendly dessert that doesn’t compromise on flavor or ease, proving that healthful eating can indeed be an indulgent experience for the whole family.
Table of Contents
Why You’ll Love This Refreshing Raspberry-Chocolate Gelatin
You are about to discover your new favorite guilt-free indulgence. This Raspberry-Chocolate Gelatin recipe is truly a game-changer for anyone seeking delicious, health-conscious desserts. Here’s why it will quickly become a staple in your home:
- Irresistible Flavor Harmony: Experience the perfect dance between tart, juicy raspberries and deep, luxurious chocolate, creating a sophisticated taste profile everyone adores.
- Remarkably Simple Preparation: Forget complicated baking. This recipe requires minimal steps, making it perfect for busy weeknights or a quick weekend treat.
- Diabetes-Friendly & Blood Sugar Aware: Crafted with your wellness in mind, this gelatin uses carefully selected ingredients to support stable blood sugar levels without sacrificing sweetness.
- Light & Satisfying Texture: Enjoy a uniquely refreshing and light dessert that satisfies your sweet tooth without feeling heavy, leaving you feeling delightfully content.

Ingredients You’ll Need
Creating this spectacular Raspberry-Chocolate Gelatin starts with quality ingredients. Remember, what you put in directly impacts the nutritional value and flavor. Opt for fresh, vibrant produce and high-quality unsweetened cocoa powder for the best results.
I always advocate for ingredients that nourish your body while delighting your palate. Here’s a detailed list to get you started:
- Unflavored Gelatin Powder: Look for a high-quality brand. This is the foundation of our gelatin’s structure. Approximately 4 envelopes (1 oz total).
- Cold Water: For blooming the gelatin. About 1 cup, divided.
- Boiling Water: To dissolve the gelatin thoroughly. About 2 cups.
- Fresh Raspberries: Approximately 2 cups. Choose bright, firm berries. They provide natural sweetness and a beautiful tang to the Raspberry-Chocolate Gelatin.
- Unsweetened Cocoa Powder: 1/4 cup. Dutch-processed cocoa works wonderfully for a darker, richer chocolate flavor without added sugars.
- Erythritol or Monk Fruit Sweetener: 1/2 cup, or to taste. These are excellent diabetes-friendly alternatives that provide sweetness without spiking blood glucose. Adjust based on your preference.
- Vanilla Extract: 1 teaspoon. Pure vanilla extract enhances both the chocolate and raspberry notes in this delicious Raspberry-Chocolate Gelatin.
- Pinch of Salt: A small pinch (1/8 teaspoon) helps to intensify the chocolate flavor and balance the sweetness.

Substitutions & Variations
One of the beauties of healthy cooking is its adaptability. This Raspberry-Chocolate Gelatin recipe is incredibly versatile, allowing you to tailor it to your dietary needs and taste preferences. Remember, even small changes can make a big difference in maintaining a diabetes-friendly profile. Here are some smart swaps and exciting variations to inspire your culinary creativity:
- For the Sweetener: If you don’t have erythritol or monk fruit, you can use stevia drops (adjusting to taste, as it’s much more potent) or another preferred sugar substitute. Always taste and adjust gradually.
- Berry Swaps: While raspberries are superb, feel free to experiment with other low-glycemic berries. Blackberries or sliced strawberries would also be fantastic in this Raspberry-Chocolate Gelatin. You can even do a mix for a berry medley!
- Chocolate Intensity: For an even deeper chocolate experience, consider adding a tablespoon of sugar-free chocolate syrup or a few drops of chocolate extract. You can also slightly increase the cocoa powder if you desire a more pronounced chocolate flavor in your Raspberry-Chocolate Gelatin.
- Creamy Topping: For a touch of decadence, serve with a dollop of unsweetened whipped cream or coconut cream. This adds a lovely texture contrast to the smooth Raspberry-Chocolate Gelatin.
- Spice it Up: A tiny pinch of cinnamon or a dash of almond extract can introduce an interesting depth of flavor. Cinnamon pairs beautifully with chocolate and can also offer blood sugar benefits.
[ra_display_video url=”https://www.youtube.com/watch?v=AVsSBrHA-Z0″]
When changing up recipes, versatility is key, and that’s exactly what you’ll find here. Consider trying this delicious Parmesan Chicken Meatloaf for another healthy and adaptable dish that’s sure to impress.
Equipment You’ll Need
Having the right tools makes any cooking project smoother and more enjoyable. For this Raspberry-Chocolate Gelatin, you won’t need anything fancy, just standard kitchen essentials:
- Medium Saucepan: For heating water and dissolving the gelatin mixture.
- Measuring Cups and Spoons: Essential for accurate ingredient proportions.
- Whisk: To ensure the gelatin and cocoa powder are thoroughly combined and smooth.
- Heat-Safe Mixing Bowl: For blooming the gelatin.
- Fine-Mesh Sieve (optional): To strain the raspberry puree for a smoother gelatin, if desired.
- 8×8 inch Glass Baking Dish or Individual Ramekins: For setting the gelatin. A glass dish helps you see the beautiful layers of your Raspberry-Chocolate Gelatin.
- Rubber Spatula: For scraping down bowls and ensuring all ingredients are incorporated.
Step-by-Step Instructions
Creating this delectable Raspberry-Chocolate Gelatin is surprisingly straightforward. Follow these clear, numbered steps, and you’ll have a stunning and healthy dessert ready to chill in no time. Focus on the details, and you’ll achieve perfect results every time.

- Bloom the Gelatin: In a heat-safe bowl, sprinkle the gelatin powder over 1 cup of cold water. Let it sit for 5-10 minutes. This process, called “blooming,” allows the gelatin granules to swell and absorb the liquid, ensuring a smooth, lump-free texture in your Raspberry-Chocolate Gelatin.
- Prepare the Raspberry Layer: In a medium saucepan, combine the fresh raspberries with 1/4 cup of the sweetener and 1/2 cup of boiling water. Bring to a gentle simmer over medium heat, stirring occasionally, until the raspberries break down and release their juices, about 5-7 minutes.
- Strain (Optional) & Cool Raspberries: If you prefer a seedless gelatin, press the raspberry mixture through a fine-mesh sieve into a clean bowl, discarding the solids. Let the raspberry liquid cool slightly while you prepare the chocolate layer. This step ensures a wonderfully smooth texture for your Raspberry-Chocolate Gelatin.
- Dissolve Gelatin: While the raspberries are cooling, heat the remaining 1.5 cups of boiling water. Pour this hot water over the bloomed gelatin in its bowl. Whisk continuously until the gelatin is completely dissolved and no granules remain. This usually takes 1-2 minutes.
- Create the Chocolate Layer: In a separate bowl, whisk together the unsweetened cocoa powder, remaining 1/4 cup of sweetener, vanilla extract, and pinch of salt. Gradually add about 1 cup of the dissolved gelatin mixture to the cocoa mixture, whisking vigorously to prevent lumps. Once smooth, combine this chocolate mixture with the remaining dissolved gelatin.
- Assemble the Layers: Pour half of the chocolate gelatin mixture into your chosen 8×8 inch glass dish or individual ramekins. Place in the refrigerator and chill for about 30-45 minutes, or until just firm enough to support the next layer but still slightly sticky. This prevents the layers from mixing.
- Add Raspberry Layer: Gently pour the slightly cooled raspberry liquid over the partially set chocolate layer. Return to the refrigerator and chill for another 30-45 minutes, or until firm.
- Add Final Chocolate Layer: Carefully pour the remaining chocolate gelatin mixture over the set raspberry layer. Place the dish back into the refrigerator and chill for a minimum of 4 hours, or preferably overnight, until the Raspberry-Chocolate Gelatin is completely firm and set.
- Serve and Enjoy: Once fully set, slice your Raspberry-Chocolate Gelatin into squares or scoop out of ramekins. Garnish with a few fresh raspberries or a sprinkle of unsweetened cocoa powder, if desired.
Making gelatin is all about precision, so stick to the steps for the best results. For a citrusy twist, why not check out this Orange Jelly recipe that also embraces simplicity?
Pro Tips for Success
Achieving a perfectly set, visually appealing, and deliciously balanced Raspberry-Chocolate Gelatin requires a few insider tricks. These tips come from years of simplifying complex recipes for busy parents and ensuring consistent, high-quality results. Pay attention to these details for an outstanding dessert:

- Perfect Blooming: Always sprinkle gelatin over cold liquid and allow it sufficient time to bloom (5-10 minutes). Rushing this step can lead to gritty gelatin or an uneven set.
- Thorough Dissolving: When adding hot liquid to bloomed gelatin, whisk continuously until every granule is dissolved. Any undissolved bits will result in a grainy texture. A warm water bath can help if you struggle with dissolving.
- Temperature Control: Ensure your raspberry liquid is cooled slightly before pouring it over the partially set chocolate layer. If it’s too hot, it will melt the chocolate layer, and your beautiful layers will merge.
- Partial Setting is Key: Do not over-chill the layers between pours. They should be firm enough to hold their shape but still slightly tacky to the touch. This “sticky” surface helps the new layer adhere better, preventing separation when served.
- Whisk Cocoa Well: When incorporating cocoa powder, whisk it into a small amount of liquid first to create a smooth paste before adding it to the bulk of the gelatin mixture. This prevents lumps and ensures even chocolate distribution throughout your Raspberry-Chocolate Gelatin.
- Sweetener Adjustment: Taste your raspberry mixture before adding it to the gelatin. Berry sweetness can vary, so adjust your diabetes-friendly sweetener accordingly to strike the perfect balance for your Raspberry-Chocolate Gelatin.
- Clean Cuts: For neat squares, dip your knife in hot water and wipe it clean between each cut. This creates clean, sharp edges for your layered Raspberry-Chocolate Gelatin.
Storage & Reheating Tips
One of the many benefits of this Raspberry-Chocolate Gelatin is its excellent shelf life, making it a perfect make-ahead dessert for meal prepping or entertaining. Proper storage ensures your gelatin remains fresh, firm, and flavorful, ready to enjoy whenever a craving strikes.

- Refrigeration is Essential: Always store your Raspberry-Chocolate Gelatin in an airtight container in the refrigerator. Gelatin is temperature-sensitive and will melt if left at room temperature for too long.
- Cover Well: To prevent the gelatin from drying out or absorbing odors from other foods in your fridge, cover it tightly with plastic wrap or a lid.
- Shelf Life: When stored correctly, this Raspberry-Chocolate Gelatin will remain fresh and delicious for up to 5-7 days in the refrigerator. It’s a fantastic option for preparing a week’s worth of diabetes-friendly treats!
- No Reheating: Gelatin is a chilled dessert and should not be reheated. Reheating will cause it to melt and alter its texture permanently. Simply remove it from the refrigerator and serve cold.
- Freezing Not Recommended: Freezing gelatin is not recommended as it will crystallize and lose its smooth, jiggly texture upon thawing. Stick to refrigeration for optimal enjoyment of your Raspberry-Chocolate Gelatin.
Proper storage is essential for keeping desserts fresh and enjoyable. Alongside this gelatin, why not prepare some Mini Chicken Pot Pies for a delightful and convenient meal prep option?
What to Serve With This Recipe
While this Raspberry-Chocolate Gelatin is a delightful stand-alone dessert, pairing it with complementary, healthy options can elevate the experience and provide a balanced meal. As Rocco Fuhrman, my focus is always on creating holistic solutions that empower you to eat well, so consider these wholesome companions:
- Fresh Fruit Platter: A simple platter of mixed berries, melon, or kiwi offers additional vitamins and fiber, creating a vibrant contrast to the rich gelatin.
- Sugar-Free Whipped Cream or Coconut Cream: A light, airy dollop adds a touch of creaminess and visual appeal without adding unwanted sugars.
- Mint Sprig: A fresh sprig of mint provides a refreshing aroma and a pop of green, enhancing the presentation of your Raspberry-Chocolate Gelatin.
- Light Cheese Board: For a more sophisticated pairing, consider serving alongside a small selection of low-fat cheeses and a few whole-grain crackers for a satisfying textural contrast.
- Herbal Tea: A warm cup of caffeine-free herbal tea, such as peppermint or chamomile, can be a soothing accompaniment, especially after an evening meal.
- Roasted Almonds or Walnuts: A small handful of lightly roasted, unsalted nuts can provide healthy fats and a satisfying crunch, balancing the smooth texture of the Raspberry-Chocolate Gelatin.
Frequently Asked Questions (FAQ)
Can I make Raspberry-Chocolate Gelatin ahead of time?
Absolutely! This Raspberry-Chocolate Gelatin is an ideal make-ahead dessert. You can prepare it up to 5-7 days in advance and store it in an airtight container in the refrigerator.
This makes it perfect for busy parents who need quick, healthy options ready to go or for entertaining guests without last-minute stress. Just ensure it has ample time to set completely, ideally overnight, for the best texture and layered appearance.
What sweeteners work best for a diabetes-friendly Raspberry-Chocolate Gelatin?
For a truly diabetes-friendly Raspberry-Chocolate Gelatin, I highly recommend using erythritol or monk fruit sweetener. Both are natural, zero-calorie, and do not impact blood sugar levels, making them excellent choices. Stevia is another viable option, but use it sparingly as it’s much more potent. Avoid artificial sweeteners like aspartame or sucralose, and always choose unsweetened cocoa powder to control added sugars.
How can I ensure my Raspberry-Chocolate Gelatin sets properly?
To ensure your Raspberry-Chocolate Gelatin sets beautifully every time, follow these key steps: First, always bloom your gelatin in cold water for 5-10 minutes. Second, ensure the gelatin is completely dissolved in the hot water – whisk until no granules remain.
Third, respect the chilling times between layers; each layer needs to be firm enough to support the next, but not fully rock-hard. Finally, allow the finished gelatin to chill for at least 4 hours, or preferably overnight, for a perfectly firm and jiggly dessert.
Raspberry-Chocolate Gelatin combines the tartness of raspberries with the richness of chocolate, resulting in a smooth and jiggly dessert. This type of gelatin dessert shows the versatility of gelatin as an ingredient, drawing on its history in culinary applications, as discussed in the article on gelatin.
Final Thoughts
This Raspberry-Chocolate Gelatin isn’t just a recipe; it’s an affirmation that healthy living can be joyful and delicious. It empowers you to enjoy sweet moments without compromise, fostering sustainable wellness for your entire family. Embrace the simplicity and savor every guilt-free bite.
Nutrition Information (per serving)
The following is an estimated nutritional breakdown for one serving of Raspberry-Chocolate Gelatin, based on approximately 8 servings per recipe, using recommended diabetes-friendly ingredients. Please note that actual values may vary depending on specific brands and ingredient quantities used.
| Nutrient | Amount |
|---|---|
| Calories | ~85 kcal |
| Total Fat | ~2 g |
| Saturated Fat | ~1 g |
| Cholesterol | ~0 mg |
| Sodium | ~15 mg |
| Total Carbohydrates | ~12 g |
| Dietary Fiber | ~4 g |
| Sugars | ~3 g |
| Erythritol/Monk Fruit | ~8 g |
| Protein | ~6 g |

Raspberry-Chocolate Gelatin
Ingredients
Method
- Bloom the gelatin by sprinkling it over 1 cup of cold water and letting it sit for 5-10 minutes.
- In a saucepan, combine fresh raspberries with 1/4 cup of sweetener and 1/2 cup of boiling water, simmer for 5-7 minutes.
- Optionally strain the raspberry mixture to remove seeds, then let it cool.
- Heat the remaining 1.5 cups of boiling water and pour it over the bloomed gelatin, whisk until dissolved.
- In a separate bowl, mix cocoa powder, remaining sweetener, vanilla, and salt. Add 1 cup of the dissolved gelatin and whisk until smooth, then combine it with the remaining gelatin.
- Pour half of the chocolate mixture into a dish and chill for 30-45 minutes until set but sticky.
- Gently pour the raspberry layer over the chocolate layer and chill for another 30-45 minutes.
- Pour the remaining chocolate mixture over the raspberry layer and refrigerate for at least 4 hours or overnight to firm up.
- Slice into squares or scoop out of ramekins and serve cold.
Notes

Diabetes Nutrition Specialist | Healthy Diet Advocate | Founder of GoldFoodie.
My passion for nutrition began with a deeply personal journey supporting my father through his battle with diabetes. Watching his daily struggles made me realize how powerful the right food choices can be in improving quality of life. That experience drove me to dedicate my career to helping others live healthier, more balanced lives.
- Rocco Fuhrman

- Rocco Fuhrman
- Rocco Fuhrman
- Rocco Fuhrman