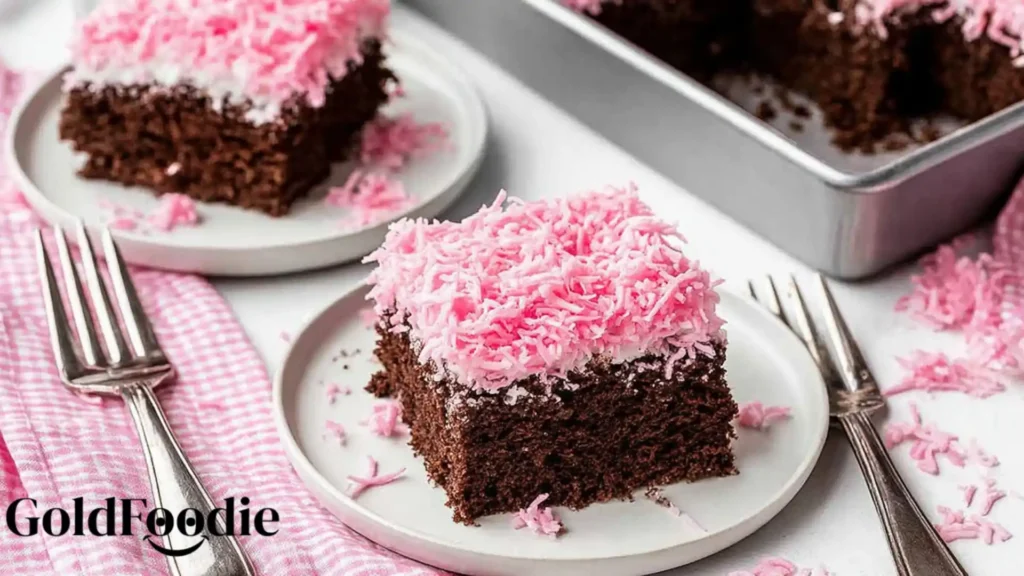
There’s something truly magical about recreating nostalgic treats from our childhood kitchens. This Snowball Cake recipe transforms the beloved, bite-sized Hostess classic into a magnificent dessert perfect for sharing. Originally introduced in 1947, the Hostess Sno-Ball has a rich history as a beloved American snack cake.
Imagine a rich, moist chocolate cake enveloped in sweet, fluffy marshmallow frosting, then generously coated in vibrant pink shredded coconut. It’s a simple pleasure that brings back cherished memories and creates new ones around the family table.
Table of Contents
Why You’ll Love This Snowball Cake Recipe
This delightful Snowball Cake recipe is more than just a dessert; it’s an experience that captures the heart of home baking.
- Classic Nostalgia: It perfectly replicates the iconic flavors of your favorite childhood snack.
- Rich Chocolate Base: You get a wonderfully moist and decadent chocolate cake every time.
- Fluffy Marshmallow Frosting: The homemade frosting is sweet, light, and incredibly satisfying.
- Vibrant Pink Coconut: The signature pink coconut adds a festive look and delightful texture.
- Surprisingly Simple: Despite its impressive appearance, this cake is straightforward to bake from scratch.
- Perfect for Any Occasion: It’s a fantastic centerpiece for parties or a comforting treat for family gatherings.

Ingredients for Snowball Cake Recipe
Crafting this delightful Snowball Cake recipe begins with fresh, quality ingredients. Each component plays a crucial role in achieving that perfect texture and flavor combination we all adore.
For the Cake
- 1 ½ cups all-purpose flour
- ½ cup unsweetened cocoa powder
- ½ teaspoon kosher salt
- 1 teaspoon baking soda
- ½ teaspoon baking powder
- ½ cup brewed hot coffee
- ½ cup whole milk
- ½ cup unsalted butter, softened to room temperature
- 1 ½ cups granulated sugar
- 2 large eggs
For the Topping
- 7 ounce jar Marshmallow Fluff
- ½ cup unsalted butter, softened to room temperature
- 1 teaspoon pure vanilla extract
- 2 cups powdered sugar
- 3 cups shredded sweetened coconut
- 2-4 drops pink food coloring
Notes & Substitutions
- Always use unsweetened cocoa powder for the best chocolate flavor, not a sweetened mix. Hot brewed coffee deeply enhances the chocolate notes without tasting like coffee; feel free to use hot water if you prefer.
- Whole milk contributes essential moisture and richness to the cake crumb.
- While homemade marshmallow fluff is an option, a jar of Marshmallow Fluff simplifies this particular Snowball Cake recipe.
- Invest in high-quality pure vanilla extract for the most authentic flavor.
- Shredded sweetened coconut is key for the classic texture, not larger flakes. Liquid food coloring typically works best for achieving an even, vibrant pink.
Equipment Needed
Gathering your tools beforehand makes baking a breeze and keeps the process joyful. For this Snowball Cake recipe, you’ll need:
- A 13×9 inch baking dish for the perfect cake size.
- An electric mixer (stand or hand-held) to easily combine ingredients.
- Several large mixing bowls for different components.
- Standard measuring cups and spoons.
- A whisk attachment for your mixer.
- An offset spatula for smooth frosting application.
- Toothpicks for testing the cake’s doneness.
How To Make Classic Snowball Cake Recipe
Baking this Snowball Cake recipe is a lovely journey, and following these steps will lead you to a delicious outcome. Take your time, enjoy the process, and let the aroma fill your kitchen.


- Prepare Baking Dish: Preheat your oven to 350 degrees F (175°C). Spray a 13×9 inch baking dish with baking spray, or prepare it with homemade cake release. Set this aside.
- Combine Dry Ingredients: In a medium bowl, whisk together the all-purpose flour, unsweetened cocoa powder, kosher salt, baking soda, and baking powder. Set this bowl aside for later.
- Combine Wet Ingredients: In a separate measuring cup or small bowl, combine the hot brewed coffee with the whole milk. This mixture will be added to the batter shortly.
- Cream Butter and Sugar: In the mixing bowl of an electric mixer, fitted with a whisk attachment, add the softened unsalted butter and granulated sugar. Beat on medium-high speed for a full 5 minutes until the mixture becomes light, fluffy, and pale. Remember to scrape down the sides of the bowl as needed to ensure everything is well combined.
- Add Eggs and Mixtures: Add the large eggs to the creamed butter and sugar mixture, one at a time, beating well after each addition until fully incorporated. Next, slowly add the dry ingredients mixture, alternating with the coffee and milk mixture. Begin and end with the dry ingredients, adding about three additions of each, beating just until combined after each addition. Do not overmix the batter.
- Bake the Cake: Pour the beautifully smooth cake batter into the prepared 13×9 inch pan. Place it in the preheated oven and bake for approximately 33-38 minutes. To check for doneness, insert a toothpick into the center of the cake; it should come out clean.
- Cool Completely: Once baked, remove the cake from the oven and place it on a wire rack. It is crucial to allow the cake to cool completely to room temperature before attempting to frost it. A warm cake will melt your frosting.
- Prepare Marshmallow Frosting: For the delicious frosting, beat together the entire 7-ounce jar of Marshmallow Fluff with the ½ cup of softened unsalted butter in a clean mixing bowl for 3-4 minutes. Beat until the two ingredients are well combined and smooth.
- Add Frosting Ingredients: Mix in the pure vanilla extract and gradually add the powdered sugar to the marshmallow mixture. Beat for another 3-4 minutes until the frosting is smooth, creamy, and light.
- Color the Coconut: In a separate medium bowl, combine the 3 cups of shredded sweetened coconut with 2-4 drops of pink food coloring. Using a wooden spoon or your hands (wearing gloves, if preferred), thoroughly mix until the color saturates all the coconut. Add more food coloring, a drop at a time, to achieve your desired shade of pink.
- Assemble Cake: Once the chocolate cake is completely cool, spread the fluffy marshmallow frosting evenly over the top using an offset spatula.
- Add Topping: Immediately after frosting, generously sprinkle the colored coconut over the entire surface of the frosted cake. Gently press the coconut into the frosting to ensure it adheres well.
- Slice and Serve: Your delightful Snowball Cake recipe is now complete! Slice it into individual portions and serve.


Pro Tips for the Perfect Snowball Cake
Achieving that perfect, comforting Snowball Cake recipe is all about a few thoughtful details.
- Room Temperature Ingredients: Ensure all your wet ingredients, especially butter and eggs, are at room temperature. This helps them combine smoothly, creating a uniform batter.
- Cream Butter and Sugar Thoroughly: Beat the butter and sugar for the full 5 minutes as instructed. This step incorporates air, leading to a light and tender cake texture.
- Test for Doneness: Always rely on the toothpick test for accuracy. An underbaked cake will be gummy, and an overbaked cake will be dry.
- Cool Cake Completely: Patience is key! Frosting a warm cake will cause the marshmallow frosting to melt and slide off, creating a messy result.
- Even Coconut Color: Mix your food coloring into the coconut thoroughly. This ensures every piece of coconut is vibrant pink, just like the classic.
- Use a Metal Pan: Metal baking pans typically conduct heat more evenly than glass, which can help prevent dry edges and ensure a consistently baked cake.
- “Zinger” Twist: For an extra layer of flavor, spread a thin layer of raspberry jam over the cooled cake before applying the marshmallow frosting.
Serving, Storage, and Variations
This homemade Snowball Cake recipe is wonderful whether served chilled or at room temperature, making it versatile for any gathering.
For storage, keep the cake covered tightly with plastic wrap or in an airtight container at room temperature for up to 5 days. The marshmallow frosting holds up well. If you want to enjoy slices later, freeze individual portions by wrapping them securely in plastic wrap and then placing them in an airtight freezer-safe container for up to 3 months. Thaw in the refrigerator or at room temperature before serving.
Variations
- Raspberry Zinger Cake: For a delightful twist reminiscent of another classic, spread a thin, even layer of raspberry preserves over the completely cooled chocolate cake before applying the marshmallow frosting.
- Snowball Cupcakes: Instead of baking in a 13×9 pan, line a muffin tin with cupcake liners and fill them about two-thirds full with batter. Adjust the baking time to approximately 18-22 minutes, or until a toothpick comes out clean. Frost and top with coconut as usual.
- Color Customization: Don’t feel limited to pink! Use different food colorings, like green or blue, to tint the coconut for holidays or themed parties.

Nutrition Information
Knowing the nutritional values can help you enjoy this indulgent Snowball Cake recipe thoughtfully. Here’s a breakdown per serving:
| Nutrient | Amount |
|---|---|
| Calories | 287 kcal |
| Carbohydrates | 39 g |
| Protein | 3 g |
| Fat | 15 g |
| Saturated Fat | 11 g |
| Polyunsaturated Fat | 0.4 g |
| Monounsaturated Fat | 2 g |
| Trans Fat | 0.2 g |
| Cholesterol | 29 mg |
| Sodium | 139 mg |
| Potassium | 136 mg |
| Fiber | 3 g |
| Sugar | 28 g |
| Vitamin A | 175 IU |
| Vitamin C | 0.2 mg |
| Calcium | 25 mg |
| Iron | 1 mg |
Frequently Asked Questions (FAQ)
Here are some common questions you might have about making this delicious Snowball Cake recipe.
Can I use espresso powder instead of hot coffee?
Yes, you certainly can! Dissolve 1-2 teaspoons of espresso powder in ½ cup of hot water or hot milk to achieve a similar chocolate-enhancing effect.
Can this recipe be made into cupcakes?
Yes, you certainly can! Dissolve 1-2 teaspoons of espresso powder in ½ cup of hot water or hot milk to achieve a similar chocolate-enhancing effect.
What type of cocoa powder should I use?
For the best, richest chocolate flavor, use unsweetened natural cocoa powder. Avoid Dutch-processed cocoa unless specifically instructed.
Can I make the coconut white instead of pink?
Yes, you can! Simply omit the pink food coloring for a classic white “snowball” appearance.
How do I ensure my cake is moist?
Avoid overmixing the batter and ensure all your ingredients are at room temperature. Also, do not overbake the cake; remove it as soon as a toothpick comes out clean.
Final Thoughts
There’s immense joy in bringing beloved memories to life in your own kitchen. This delightful homemade Snowball Cake recipe offers the perfect combination of rich chocolate cake, sweet and fluffy marshmallow frosting, and tender, vibrant coconut.
It’s a fun, easy treat that truly brings smiles to faces, embodying the spirit of family connection and simple pleasures. Share your delicious creation with friends and family, and watch their faces light up with nostalgia and happiness.

Classic Snowball Cake Recipe
Ingredients
Equipment
Method
- Preheat the oven to 350 degrees F and prepare a 13×9 baking dish with baking spray or homemade cake release.
- In a bowl, combine the flour, cocoa powder, salt, baking soda, and baking powder, then set aside.
- In a measuring cup, combine the hot coffee with the milk, then set aside.
- In a mixing bowl with an electric mixer, beat the softened butter and granulated sugar for 5 minutes, scraping down the sides as needed.
- Add the eggs one at a time, then slowly add the dry ingredients, alternating with the coffee mixture in about three additions of each.
- Pour the cake batter into the prepared pan and bake for 33-38 minutes, or until a toothpick inserted in the center comes out clean. Remove the cake from the oven and cool completely.
- For the frosting, beat the Marshmallow Fluff with softened butter for 3-4 minutes until combined, then add vanilla extract and powdered sugar and beat for another 3-4 minutes until smooth and creamy.
- In a separate bowl, combine the shredded coconut with 2-4 drops of pink food coloring, mixing thoroughly with a wooden spoon until the color saturates all the coconut.
- Spread the frosting evenly over the cooled chocolate cake using an offset spatula, then immediately sprinkle on the colored coconut. Slice and serve your Classic Snowball Cake.
Notes

Hi there, I’m chef living in New York City. Every morning, I wake up to the sounds of my little one’s laughter and the comforting routine of preparing breakfast for my family my husband, our child, and my beloved mother, who’s become both my rock and my inspiration since my father passed away. As the only daughter left in our family, I feel a deep responsibility to carry on his memory whenever I step into the kitchen.
- Dominique

- Dominique
- Dominique
- Dominique