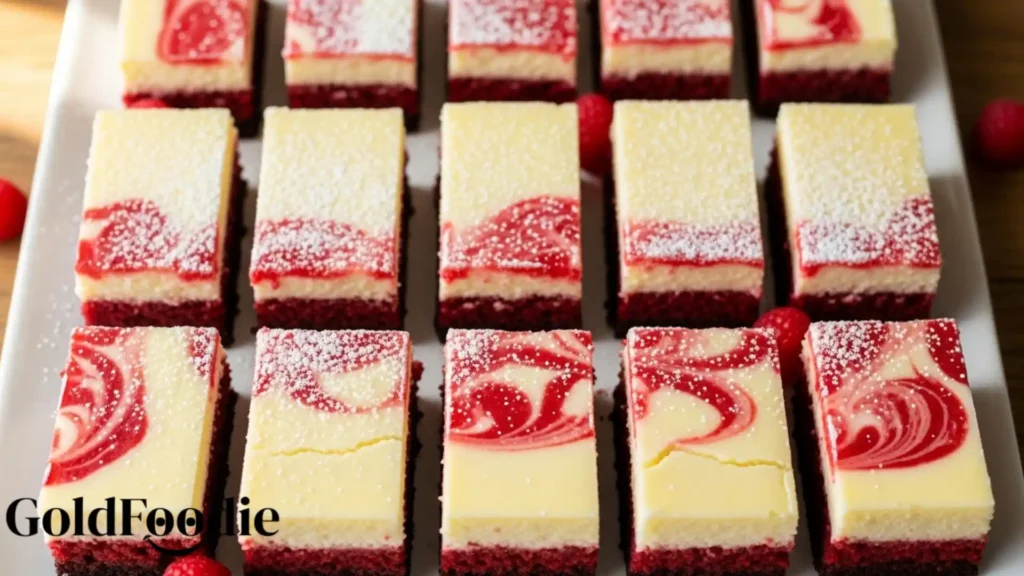
Prepare for pure delight: the decadent flavor of red velvet cake meets creamy, tangy cheesecake in these exquisite bars. These Red Velvet Cheesecake Bars offer a vibrant visual and an unforgettable taste, proving smart indulgence is possible. As Anne Newgent, I empower you to enjoy delicious moments while fueling your body. Let’s create a treat supporting your strong, active lifestyle.
Table of Contents
Why You’ll Love These Red Velvet Cheesecake Bars
You’re busy, you’re driven, and you deserve treats that align with your energy goals. These Red Velvet Cheesecake Bars are more than just a dessert; they are a strategic choice for sustaining your vitality.
- Irresistible Flavor Fusion: Experience the iconic red velvet tang perfectly balanced with rich, creamy cheesecake. These Red Velvet Cheesecake Bars deliver pure satisfaction.
- Effortless Elegance: Simple to prepare, yet stunningly impressive. Perfect for busy professionals who demand both quality and efficiency.
- Smart Indulgence Potential: Designed with an eye towards balance, these bars can be optimized to support muscle preservation and provide sustained energy, keeping you vibrant.

Ingredients You’ll Need
Crafting exceptional Red Velvet Cheesecake Bars begins with selecting quality ingredients. Focus on sourcing items that will not only enhance flavor but also offer nutritional value, supporting your active lifestyle.
- For the Crust:
- 1 ½ cups high-protein graham cracker crumbs (or digestive biscuits, crushed)
- ¼ cup erythritol or monk fruit sweetener blend (optional, for lower sugar)
- ½ cup melted grass-fed butter or coconut oil
- For the Red Velvet Cheesecake Filling:
- 2 (8-ounce) blocks full-fat cream cheese, softened (consider protein-enhanced cream cheese if available)
- ½ cup granulated erythritol or monk fruit blend
- 2 large pasture-raised eggs
- ¼ cup unsweetened Greek yogurt (for added protein and tang)
- 1 teaspoon vanilla extract
- 1 tablespoon unsweetened cocoa powder
- 1 teaspoon apple cider vinegar (enhances red color)
- 1 teaspoon red food coloring (gel for best results)
- Pinch of sea salt
- For the Cream Cheese Swirl Topping:
- 4 ounces full-fat cream cheese, softened
- 2 tablespoons granulated erythritol or monk fruit blend
- 1 tablespoon milk (dairy or unsweetened almond)
- ½ teaspoon vanilla extract

Substitutions & Variations
Empower your culinary journey by customizing these Red Velvet Cheesecake Bars to fit your unique nutritional goals. Elevate your treat with smart swaps that bolster protein and reduce unnecessary sugars, ensuring every bite contributes to your vitality.
- Boost Protein: Incorporate 2 tablespoons of unflavored collagen peptides into the cheesecake filling or replace a portion of the graham cracker crumbs with a protein-fortified biscuit for the crust. Using high-protein Greek yogurt in the filling also significantly elevates the protein content of these Red Velvet Cheesecake Bars.
- Lower Sugar: Stick with erythritol or monk fruit sweetener for both the filling and the topping. For the crust, choose sugar-free graham crackers or a nut-based crust made with almond flour and minimal sweetener.
- Gluten-Free: Use gluten-free graham cracker crumbs or create a simple almond flour crust (1 ½ cups almond flour, ¼ cup sweetener, ¼ cup melted butter/coconut oil).
- Dairy-Free: Utilize plant-based cream cheese alternatives and a dairy-free milk option. Ensure your butter is swapped for coconut oil or a vegan butter substitute.
- Natural Color: For a less intense, natural red hue, use beetroot powder (1-2 teaspoons, dissolved in a tiny bit of water) instead of artificial food coloring. The flavor may slightly shift, but the nutritional benefits are enhanced.
Note: This video is for demonstration purposes and may use a slightly different methode.
To further enhance your culinary experience, consider trying out these delightful Red Velvet Donuts next. They offer a unique twist on the classic flavor that is perfect for breakfast or dessert.
Equipment You’ll Need
Efficiency in the kitchen is key, especially for busy professionals. Having the right tools ensures a smooth and enjoyable baking process for your Red Velvet Cheesecake Bars.
- 9×13-inch baking pan
- Parchment paper
- Large mixing bowls (2)
- Electric mixer (stand or hand-held)
- Measuring cups and spoons
- Rubber spatula
- Small saucepan (for melting butter/coconut oil)
- Whisk
- Toothpick or skewer (for swirling)
Step-by-Step Instructions
Creating these delightful Red Velvet Cheesecake Bars is a straightforward process when you follow these clear, actionable steps. Precision leads to perfection in your quest for a high-efficiency treat.

- Prepare the Oven and Pan: Preheat your oven to 325°F (160°C). Line a 9×13-inch baking pan with parchment paper, leaving an overhang on the sides to easily lift the bars later. Lightly grease the paper.
- Make the Crust: In a medium bowl, combine the graham cracker crumbs, sweetener (if using), and melted butter or coconut oil. Press the mixture firmly and evenly into the bottom of the prepared pan. Bake for 8-10 minutes, then remove from the oven and let it cool slightly.
- Prepare the Cheesecake Filling: In a large mixing bowl, using an electric mixer, beat the softened cream cheese and granulated sweetener until smooth and creamy, with no lumps.
- Add Wet Ingredients to Filling: Beat in the eggs one at a time, ensuring each is fully incorporated before adding the next. Stir in the Greek yogurt, vanilla extract, cocoa powder, apple cider vinegar, red food coloring, and sea salt until the mixture is uniformly smooth and vibrantly red. Do not overmix. This is the heart of your Red Velvet Cheesecake Bars.
- Pour Filling Over Crust: Carefully pour the red velvet cheesecake filling over the cooled crust, spreading it evenly with a spatula.
- Create the Swirl Topping: In a separate small bowl, beat the softened cream cheese, sweetener, milk, and vanilla extract until smooth and creamy.
- Add Swirl to Bars: Drop small dollops of the cream cheese swirl mixture over the red velvet filling. Using a toothpick or skewer, gently swirl the cream cheese into the red velvet layer to create an attractive marbled pattern.
- Bake the Cheesecake Bars: Place the pan in the preheated oven and bake for 30-35 minutes, or until the edges are set and the center is just slightly jiggly. Overbaking can lead to cracks.
- Cool and Chill: Remove the Red Velvet Cheesecake Bars from the oven and let them cool completely on a wire rack at room temperature. Once cooled, transfer the pan to the refrigerator and chill for at least 4 hours, or preferably overnight, to allow them to set completely. This crucial step ensures clean cuts and optimal texture for your Red Velvet Cheesecake Bars.
- Cut and Serve: Once thoroughly chilled, use the parchment paper overhang to lift the entire cheesecake out of the pan. Place it on a cutting board and slice into 16-24 bars using a sharp, warm knife (wipe clean between cuts). Serve and enjoy your magnificent Red Velvet Cheesecake Bars!
For those who enjoy the experience of cooking, creating Red Velvet Cookies can be another fun way to embrace the vibrant flavor of red velvet. These cookies pair wonderfully with the rich taste of cheesecake bars.
Pro Tips for Success
Achieving perfection in your Red Velvet Cheesecake Bars is about understanding a few key techniques. These expert tips will ensure your bars are not only delicious but also flawlessly presented.

- Room Temperature Ingredients are Key: Ensure your cream cheese and eggs are at room temperature. This prevents lumps in the filling and ensures a smooth, uniform texture in your cheesecake bars. Cold ingredients can lead to overmixing, which introduces too much air.
- Do Not Overmix: Beat the cream cheese and sweetener until just smooth. Once you add the eggs, beat only until incorporated. Overmixing introduces excess air, which can cause your cheesecake to puff up and then crack as it cools.
- Gentle Swirling: When creating the cream cheese swirl, use a light hand. You want to marble the two layers, not fully blend them. A few gentle passes with a toothpick are sufficient for an elegant design.
- The Water Bath Advantage: For an even more crack-free and creamy texture, you can bake your Red Velvet Cheesecake Bars in a water bath. Place your baking pan inside a larger roasting pan, then fill the roasting pan with hot water halfway up the sides of your cheesecake pan before baking. This provides moist, even heat.
- Clean Cuts: To achieve perfectly clean slices for your Red Velvet Cheesecake Bars, chill them thoroughly. Before cutting, dip a sharp knife in hot water and wipe it clean between each slice. This creates crisp, professional-looking edges.
Storage & Reheating Tips
Proper storage is essential to maintain the freshness and delightful texture of your Red Velvet Cheesecake Bars, allowing you to enjoy them for days.
- Refrigerator: Store leftover Red Velvet Cheesecake Bars in an airtight container in the refrigerator for up to 5-7 days.
- Freezer: For longer storage, freeze individual bars. Wrap each bar tightly in plastic wrap, then place them in an airtight freezer-safe container or bag. They will keep for up to 2-3 months. Thaw in the refrigerator overnight or at room temperature for about an hour before serving.
- Reheating: These bars are best served chilled or at room temperature. Reheating is not recommended as it can alter the delicate texture of the cheesecake.

Storing your treats properly is crucial and, if you love red velvet, you’ll want to preserve the flavor of these bars just like you would with a Heart Shaped Red Velvet Cake. This ensures that every bite remains as fresh and delicious as the day you made them.
What to Serve With This Recipe
While these Red Velvet Cheesecake Bars are a treat in themselves, pairing them thoughtfully can elevate the experience and align with a balanced, high-vitality lifestyle. Think about light, fresh accompaniments.
- Fresh Berries: A handful of vibrant fresh raspberries, strawberries, or blueberries provides a beautiful contrast in flavor and texture, along with a boost of antioxidants.
- Unsweetened Coffee or Tea: A strong, unsweetened coffee or a delicate herbal tea perfectly complements the richness of the cheesecake without adding extra sugar.
- Protein-Rich Meal: Serve these Red Velvet Cheesecake Bars as a dessert after a balanced meal featuring lean protein (like grilled chicken, salmon, or lentils) and plenty of fibrous vegetables. This ensures you’re fueling your body efficiently before indulging in a treat.
- Light Greek Yogurt: A small dollop of plain, unsweetened Greek yogurt on the side can add a touch more protein and a pleasant tang, enhancing the overall profile.
- Mint Garnish: A simple sprig of fresh mint adds an elegant visual and a refreshing aromatic note.
Frequently Asked Questions (FAQ)
Can I make these Red Velvet Cheesecake Bars high-protein?
Absolutely! As Anne Newgent, I advocate for optimizing every meal, and desserts are no exception. You can enhance the protein content by using high-protein graham cracker crumbs for the crust, incorporating unflavored collagen peptides into the cheesecake filling (start with 2 tablespoons), and using protein-fortified cream cheese or a significant portion of Greek yogurt. These simple swaps make your Red Velvet Cheesecake Bars a smarter choice.
How long do Red Velvet Cheesecake Bars last?
When stored properly in an airtight container in the refrigerator, your Red Velvet Cheesecake Bars will maintain their peak freshness and deliciousness for 5-7 days. Beyond that, the texture and flavor might start to diminish, so it’s best to enjoy them within that timeframe.
Can I freeze Red Velvet Cheesecake Bars?
Yes, these Red Velvet Cheesecake Bars freeze beautifully! For best results, allow them to set completely, then slice them into individual bars. Wrap each bar tightly in plastic wrap, then place them in a freezer-safe bag or container.
They will keep in the freezer for up to 2-3 months. Thaw them in the refrigerator overnight before serving to preserve their texture.
These decadent bars seamlessly blend the flavors of classic red velvet cake with the rich creaminess of cheesecake, showcasing the versatility of dessert options today. For a deeper understanding of this delightful dessert, you can explore its origins and variations in cheesecake.
Final Thoughts
These Red Velvet Cheesecake Bars are a testament to my philosophy: you can enjoy life’s delicious moments while empowering your body. Savor this vibrant, protein-optimizable treat as part of your journey towards sustained energy, strength, and an unshakeable sense of vitality.
Nutrition Information (per serving)
(Estimated per serving, based on 16 bars and using standard ingredients. Varies with substitutions.)
| Nutrient | Amount |
|---|---|
| Calories | 320-350 kcal |
| Protein | 8-10g |
| Fat | 22-25g |
| Carbohydrates | 25-30g |
| Fiber | 1-2g |
| Sugar | 18-22g |

Red Velvet Cheesecake Bars
Ingredients
Method
- Preheat your oven to 325°F (160°C). Line a 9×13-inch baking pan with parchment paper, leaving an overhang on the sides.
- In a medium bowl, combine the graham cracker crumbs, sweetener (if using), and melted butter or coconut oil. Press the mixture into the bottom of the prepared pan. Bake for 8-10 minutes, then let it cool slightly.
- In a large mixing bowl, beat the softened cream cheese and granulated sweetener until smooth.
- Beat in the eggs one at a time, then stir in Greek yogurt, vanilla extract, cocoa powder, apple cider vinegar, red food coloring, and sea salt until smooth.
- Pour the cheesecake filling over the cooled crust, spreading it evenly.
- In a small bowl, beat together the cream cheese, sweetener, milk, and vanilla extract until smooth.
- Drop dollops of the cream cheese mixture over the red velvet filling, then swirl with a toothpick.
- Bake for 30-35 minutes, until edges are set and the center is slightly jiggly.
- Let it cool completely, then chill in the refrigerator for at least 4 hours or overnight.
- Lift the cheesecake out of the pan using the parchment paper and slice into bars.
Notes

High-Protein Nutrition Specialist and Wellness Advocate with over a decade of experience.
My human-first approach blends science-backed guidance with real-life empathy, shaped by my own journey through fatigue and muscle loss. Today, I help people reclaim strength, energy, and confidence through high-protein nutrition that’s both practical and empowering.
- Anne Newgent

- Anne Newgent
- Anne Newgent
- Anne Newgent