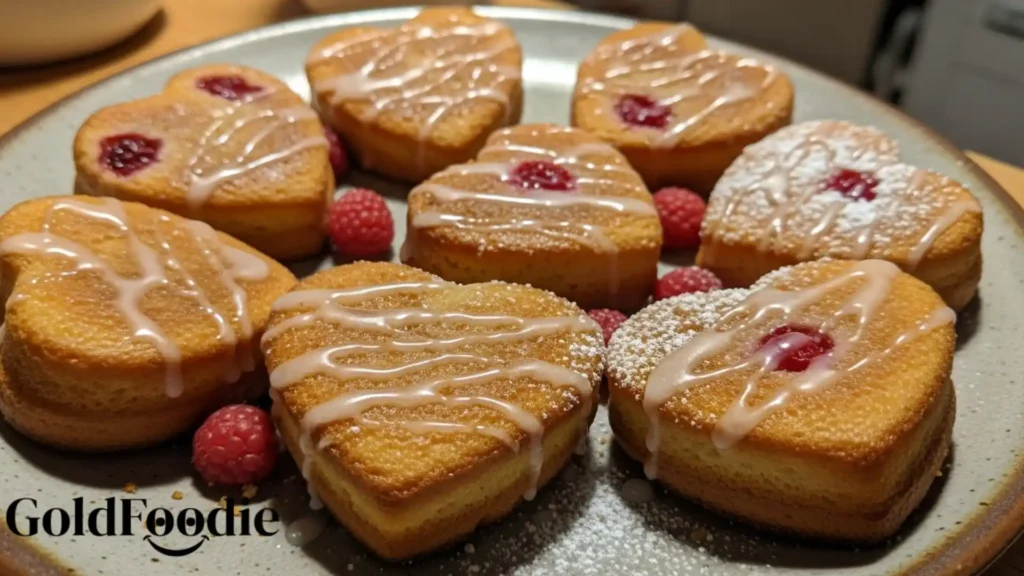
Welcome to a recipe that will truly capture your heart and delight your loved ones: delicious Mini Heart Cakes. These charming little treats boast a delicate crumb, a moist texture, and a subtly sweet flavor, making them perfect for any occasion that calls for a touch of warmth and affection.
Whether celebrating a special milestone or simply showing someone you care, these delightful heart-shaped creations are sure to bring smiles and joy to every table. Get ready to bake a batch of love!
Why You’ll Love These Mini Heart Cakes
- They offer an irresistible balance of tender sweetness and rich flavor, perfect for any palate.
- The simple, straightforward steps make these Mini Heart Cakes an absolute joy to bake, even for beginners.
- Each individual portion allows for mindful indulgence, making these heart-shaped treats a delightful, wholesome dessert option.
- These charming individual cakes are incredibly versatile, ideal for romantic gestures, family gatherings, or a simple pick-me-up.

Ingredients You’ll Need
Crafting the perfect batch of Mini Heart Cakes begins with selecting the finest ingredients. Think quality, freshness, and the kind of wholesome goodness that speaks to generations of baking traditions. My grandmother always said, “Good ingredients are the heart of a good meal,” and I couldn’t agree more when it comes to these cherished treats.
- All-Purpose Flour: Opt for unbleached, organic flour if possible. It provides the structure for our delicate cakes.
- Granulated Sugar: Choose a fine-grain sugar for a smooth sweetness that blends seamlessly.
- Baking Powder: Fresh baking powder ensures a perfect rise, giving our Mini Heart Cakes that light, airy texture.
- Salt: Just a pinch of sea salt enhances all the other flavors, bringing out the depth in the cake.
- Unsalted Butter: High-quality unsalted butter, softened to room temperature, provides richness and tenderness. It truly makes a difference in flavor.
- Large Eggs: Free-range, organic eggs, also at room temperature, bind the ingredients and contribute to a moist crumb.
- Milk: Whole milk works best for richness, but any milk will do. Ensure it’s at room temperature for better emulsion.
- Vanilla Extract: Pure vanilla extract, not imitation, is essential. It imparts that classic, comforting aroma and flavor to our Mini Heart Cakes.
- Optional Glaze Ingredients: Powdered sugar, a splash of milk or lemon juice, and a touch more vanilla for a simple, elegant finish.

Substitutions & Variations
Baking is an expression of love, and sometimes that means adapting to dietary needs or simply trying something new. These healthy swaps ensure everyone can enjoy these delightful Mini Heart Cakes without compromising on taste or quality. My family has always believed in making recipes accessible and enjoyable for everyone.
- Flour Alternatives: For a gluten-free option, substitute the all-purpose flour with a 1:1 gluten-free baking blend that contains xanthan gum. The texture of your Mini Heart Cakes will remain beautifully tender.
- Sugar Reductions: You can reduce the granulated sugar by up to 1/4 cup without significantly impacting the texture. For a refined sugar-free alternative, try substituting with coconut sugar or a natural sweetener like stevia blend, adjusting to taste.
- Dairy-Free Milk: Easily swap dairy milk for unsweetened almond milk, oat milk, or soy milk. Ensure these are also at room temperature.
- Dairy-Free Butter: Use a good quality plant-based butter alternative in equal measure for a dairy-free version of these sweet heart cakes.
- Flavor Variations: Introduce lemon zest, orange zest, or a touch of almond extract for a different flavor profile. You could also fold in a handful of finely chopped berries for a fruity burst in your Mini Heart Cakes.
[ra_display_video url=”https://www.youtube.com/watch?v=gYeLfAif0uk”]
If you’re looking for more delicious adaptations to traditional recipes, check out our Savory Mini Pizza Donuts. These delightful bites prove that baking can be both fun and fulfilling, accommodating various dietary needs while still delivering on taste. Savory Mini Pizza Donuts
Equipment You’ll Need
Having the right tools makes baking these Mini Heart Cakes an even more enjoyable experience. My grandmother always kept her kitchen simple but well-equipped, and I find that thoughtful selection of tools makes all the difference.
- Heart-Shaped Muffin Tin or Silicone Mold: Essential for achieving the iconic heart shape. A standard 12-cavity tin or silicone mold works perfectly.
- Mixing Bowls: Several sizes for combining wet and dry ingredients.
- Electric Mixer: A stand mixer or hand mixer makes creaming butter and sugar much easier and more efficient.
- Whisk: For thoroughly combining dry ingredients.
- Spatula: For scraping down bowls and folding ingredients gently.
- Measuring Cups and Spoons: Accurate measurements are key for consistent results.
- Wire Rack: For cooling the Mini Heart Cakes completely after baking.
Step-by-Step Instructions
Baking these Mini Heart Cakes is a journey of love, step by simple step. Each action brings you closer to creating something truly special for those you cherish. Follow these instructions carefully, and you’ll find joy in the process and delight in the outcome.

- Preheat Oven & Prepare Molds: Preheat your oven to 350°F (175°C). Grease and flour your heart-shaped muffin tin or silicone mold thoroughly. If using silicone, greasing is still a good idea for easy release.
- Combine Dry Ingredients: In a medium bowl, whisk together the all-purpose flour, granulated sugar, baking powder, and salt. Make sure everything is evenly distributed.
- Cream Butter & Sugar: In a large mixing bowl, using an electric mixer, cream together the softened unsalted butter and granulated sugar on medium speed until the mixture is light and fluffy, usually 2-3 minutes. This step incorporates air, making your Mini Heart Cakes tender.
- Add Eggs: Beat in the large eggs one at a time, mixing well after each addition. Scrape down the sides of the bowl to ensure everything is fully incorporated.
- Alternate Dry & Wet Ingredients: Gradually add the dry ingredients to the wet ingredients in three additions, alternating with the milk in two additions. Begin and end with the dry ingredients. Mix on low speed just until combined, being careful not to overmix. Overmixing can lead to tough cakes.
- Fold in Vanilla: Gently fold in the pure vanilla extract with a spatula until just incorporated.
- Fill Molds: Spoon the batter evenly into the prepared heart-shaped cavities, filling each about two-thirds full. These delightful heart cakes will rise during baking.
- Bake: Bake for 18-22 minutes, or until a wooden skewer or toothpick inserted into the center of a cake comes out clean. The baking time can vary depending on your oven and mold material.
- Cool: Remove the tin from the oven and let the Mini Heart Cakes cool in the mold for about 5 minutes before carefully transferring them to a wire rack to cool completely.
- Glaze (Optional): Once completely cool, whisk together powdered sugar, a splash of milk or lemon juice, and vanilla extract until smooth. Drizzle over the cooled cakes.
For another step-by-step baking adventure, try making Mini Chicken Pot Pies, a recipe that also celebrates love and creativity in the kitchen. Just like the Mini Heart Cakes, you’ll find joy in crafting each delightful bite. Mini Chicken Pot Pies
Pro Tips for Success
Baking is an art, and a few little secrets passed down through generations can elevate your Mini Heart Cakes from good to absolutely unforgettable. These technical tips will help you achieve perfection every time.

- Room Temperature Ingredients: Always ensure your butter, eggs, and milk are at room temperature. This allows them to emulsify properly, creating a smooth batter and a more uniform, tender crumb for your perfect heart-shaped cakes.
- Do Not Overmix: Once you add the flour, mix just until the ingredients are combined. Overmixing develops the gluten in the flour, leading to dense, tough Mini Heart Cakes instead of light and airy ones.
- Accurate Measurements: Use proper measuring cups and spoons, leveling off dry ingredients. For flour, spoon it into the measuring cup and then level it off, rather than scooping directly from the bag, which can compact it.
- Oven Temperature: Invest in an oven thermometer to verify your oven’s actual temperature. Many ovens run hot or cold, and precise temperature control is crucial for consistent baking of these delicate treats.
- Even Filling: Use an ice cream scoop or a consistent spoon to ensure each cavity is filled with roughly the same amount of batter. This promotes even baking and uniform Mini Heart Cakes.
- Cooling Patience: Allow your cakes to cool in the pan for the recommended 5 minutes before transferring to a wire rack. This helps them set and prevents breakage when you remove them.
- Glazing Technique: If glazing, ensure the Mini Heart Cakes are completely cool. If they are warm, the glaze will melt and be absorbed rather than setting beautifully on top.
Storage & Reheating Tips
These delightful Mini Heart Cakes are best enjoyed fresh, but sometimes we need to store them for later. Proper storage ensures they retain their tender texture and charming flavor, ready to bring joy again.

- Room Temperature: Store unglazed Mini Heart Cakes in an airtight container at room temperature for up to 2-3 days.
- Refrigeration: If your cakes are glazed or if your kitchen is particularly warm, you can store them in an airtight container in the refrigerator for up to 5 days. Bring them to room temperature before serving for the best flavor and texture.
- Freezing: For longer storage, individually wrap cooled Mini Heart Cakes in plastic wrap, then place them in an airtight freezer-safe bag or container. They can be frozen for up to 2-3 months.
- Thawing: Thaw frozen cakes overnight in the refrigerator or at room temperature for a few hours.
- Reheating: While typically enjoyed at room temperature, you can gently warm plain Mini Heart Cakes in a microwave for 10-15 seconds for a just-baked feel, if desired. Avoid reheating glazed cakes in the microwave as the glaze may melt.
If you’re interested in storing delicious baked treats, you might want to explore our Delicious & Easy Mini Shepherds Pies recipe. It’s a fantastic way to ensure your culinary creations remain just as delightful the next time you enjoy them. Delicious & Easy Mini Shepherds Pies
What to Serve With This Recipe
While these Mini Heart Cakes are perfect on their own, pairing them thoughtfully can turn a simple treat into a truly memorable experience. I love to offer options that complement their sweetness without overpowering them, always keeping health and freshness in mind.
- Fresh Berries: A colorful medley of fresh strawberries, raspberries, and blueberries offers a beautiful contrast in flavor and adds a burst of antioxidants.
- Greek Yogurt with Honey: A dollop of creamy Greek yogurt drizzled with a touch of local honey provides a tangy, protein-rich complement to the sweet heart cakes.
- Light Fruit Compote: A homemade compote made from seasonal fruits like apples, peaches, or cherries, lightly sweetened, can be a lovely warm or cool topping for these Mini Heart Cakes.
- Herbal Tea or Coffee: A warm cup of chamomile tea, peppermint tea, or a freshly brewed coffee makes these charming heart cakes an ideal afternoon treat.
- A Simple Salad: For a brunch or lighter dessert, serve your mini cakes alongside a small, vibrant salad with mixed greens, a light vinaigrette, and perhaps some toasted nuts. This adds freshness and balance.
- Whipped Coconut Cream: For a dairy-free and lighter alternative to traditional whipped cream, try whipped coconut cream. It’s rich, fluffy, and pairs wonderfully with these sweet little cakes.
Frequently Asked Questions (FAQ)
Can I make these Mini Heart Cakes ahead of time?
Absolutely! You can prepare the batter for your Mini Heart Cakes up to 24 hours in advance. Store the batter, covered, in the refrigerator.
When you’re ready to bake, give the batter a gentle stir and then proceed with filling your molds and baking as usual. This can be a fantastic time-saver, especially if you’re planning for a special occasion. Alternatively, you can bake the mini heart cakes entirely, allow them to cool completely, and then store them in an airtight container. If you plan to freeze them, skip the glaze until they are thawed and ready to serve for the best results.
How can I prevent my Mini Heart Cakes from sticking to the mold?
Preventing sticking is crucial for perfect Mini Heart Cakes. First, ensure you thoroughly grease your heart-shaped muffin tin or silicone mold. For metal tins, grease with butter or non-stick spray, then lightly dust with flour, tapping out any excess.
Even with silicone molds, a light spray of non-stick oil can make a difference. Make sure your molds are completely cooled before attempting to remove the cakes. A common mistake is trying to pop them out too soon.
Let them set in the mold for about 5 minutes after coming out of the oven, then carefully invert them onto a wire rack to finish cooling. If using metal, running a thin knife gently around the edges before inverting can also help.
What’s the best way to get a perfectly smooth glaze for these heart-shaped treats?
Achieving a smooth, consistent glaze for your Mini Heart Cakes is simple with a few tricks. First, sift your powdered sugar before mixing. This removes any lumps, ensuring a silky-smooth base.
Second, add your liquid (milk or lemon juice) gradually, a teaspoon at a time, while whisking constantly. You want a consistency that’s thick enough to coat a spoon but thin enough to drizzle smoothly. For an extra shine, you can use a touch of corn syrup in your glaze, though it’s not strictly necessary.
Ensure your mini heart cakes are completely cool before glazing. If they’re even slightly warm, the glaze will melt and soak into the cake, rather than forming a beautiful, set layer.
Mini Heart Cakes are delightful confections that encapsulate affection in their charming shape and sweet taste. Known for their versatility, these treats can bring smiles to both intimate gatherings and festive celebrations, showcasing the artistry of home baking in a heartwarming way. Learn more about their origin and variations in this cake overview.
Final Thoughts
These Mini Heart Cakes are more than just a dessert; they are a symbol of the love and warmth we share. As Dominique, I hope this recipe brings generations together, creating new memories infused with sweetness and affection, just as my family has always cherished.
Nutrition Information (per serving)
| Nutrient | Amount |
|---|---|
| Calories | ~180 kcal |
| Total Fat | ~8g |
| Saturated Fat | ~5g |
| Cholesterol | ~40mg |
| Sodium | ~120mg |
| Total Carbohydrates | ~25g |
| Dietary Fiber | ~0.5g |
| Total Sugars | ~15g |
| Protein | ~2g |

Mini Heart Cakes
Ingredients
Method
- Preheat your oven to 350°F (175°C) and grease/flour your heart-shaped mold.
- In a medium bowl, whisk together flour, sugar, baking powder, and salt.
- In a large bowl, cream together softened butter and sugar until light and fluffy.
- Beat in eggs one at a time, mixing well after each addition.
- Gradually add dry ingredients, alternating with milk, mixing until just combined.
- Gently fold in vanilla extract.
- Fill the heart-shaped cavities about two-thirds full with batter.
- Bake for 18-22 minutes until a toothpick comes out clean.
- Cool in the mold for 5 minutes, then transfer to a wire rack.
- Prepare the optional glaze if desired and drizzle over cooled cakes.
Notes

Hi there, I’m chef living in New York City. Every morning, I wake up to the sounds of my little one’s laughter and the comforting routine of preparing breakfast for my family my husband, our child, and my beloved mother, who’s become both my rock and my inspiration since my father passed away. As the only daughter left in our family, I feel a deep responsibility to carry on his memory whenever I step into the kitchen.
- Dominique

- Dominique
- Dominique
- Dominique