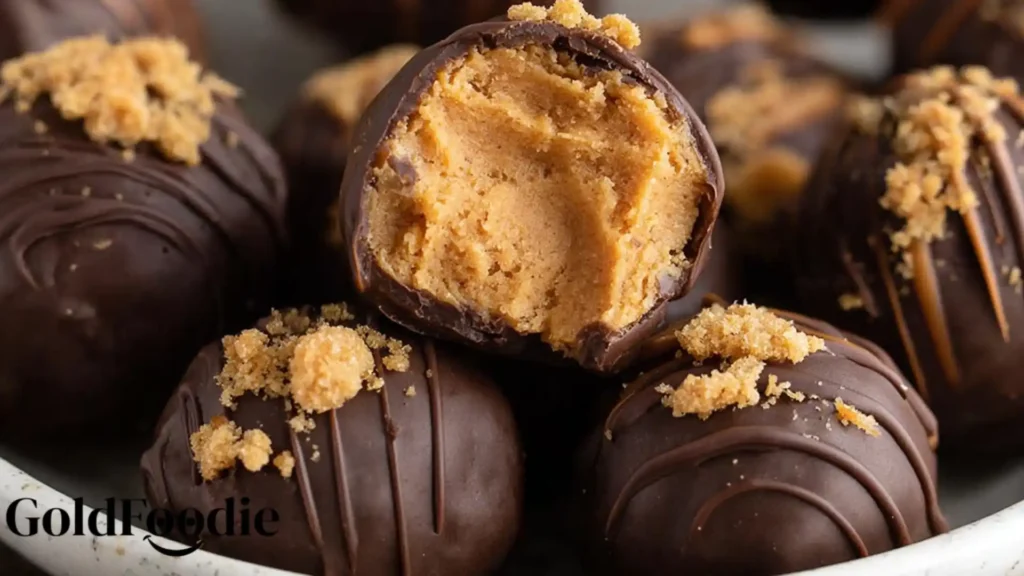
Welcome to a world of simple, delightful indulgence! This no-bake recipe brings together the classic comfort of peanut butter and chocolate with the unmistakable crunch of Butterfinger candy. It is truly a treat that honors sweet memories and creates new connections around the kitchen table. Perfect for any gathering, these delightful sweets are effortless to make and even easier to enjoy.
Table of Contents
Why You’ll Love These Butterfinger Balls
These homemade Butterfinger Balls are destined to become a family favorite, offering a charming blend of simplicity and irresistible flavor.
- Effortlessly Easy: No baking required, making them perfect for all skill levels, especially beginners.
- Quick to Prepare: From mixing to chilling, these come together in a snap, ideal for spontaneous cravings.
- Crowd-Pleading Flavor: The beloved combination of peanut butter, chocolate, and crisp candy guarantees smiles.
- Customizable Fun: Easily personalize them with various toppings, adding a touch of your unique style.
- Perfect for Any Occasion: A wonderful addition to parties, holidays, or thoughtful homemade gifts.

Ingredients
Gathering the right ingredients is the first step to creating these delightful no-bake Butterfinger Balls. Each component plays a crucial role in achieving that perfect texture and flavor.
- 1 cup creamy peanut butter (not all natural types)
- 4 tablespoons unsalted butter, softened (½ stick)
- 1 teaspoon pure vanilla extract
- 1 cup powdered sugar
- ¾ cup graham cracker crumbs
- ½ cup crushed Butterfinger bars
- 8 ounces chocolate bark or melting wafers (or chocolate chips)
- Optional garnishes: additional crushed Butterfingers, holiday sprinkles, or coarse sea salt
Notes & Substitutions
- Peanut Butter: Always use creamy, regular peanut butter (like Jif or Skippy) for the best results. Natural peanut butter, which separates, can make the mixture too oily or loose. If you do use it, you might need to increase the graham cracker crumbs slightly to absorb excess oil and achieve the right consistency.
- Butter: Unsalted butter is preferred, allowing you to control the overall saltiness. Ensure it’s truly softened, not melted, so it creams smoothly with the peanut butter.
- Graham Crackers: You can purchase pre-crumbled graham crackers or easily crush your own. Simply place whole crackers in a freezer bag and crush them with a rolling pin or pulse them in a food processor until fine.
- Butterfinger: For ease, use pre-crushed Butterfinger baking bits if available. Otherwise, crushing full-size Butterfinger bars yourself works perfectly.
- Chocolate: Chocolate bark or melting wafers are recommended for their smooth melting and setting properties without needing tempering. If using chocolate chips or baking bars, they may require tempering for a truly glossy, snap-worthy coating, which is a technique we’ll discuss in the pro tips.

Equipment
Having the right tools on hand makes preparing these no-bake Butterfinger treats a breeze. Simplicity in equipment allows more focus on the joy of creating.
- Electric mixer (handheld or stand mixer with paddle attachment)
- Large mixing bowl
- Measuring cups and spoons
- Cookie scoop (1 to 1.5 tablespoon size)
- Baking sheet
- Parchment paper or wax paper
- Microwave-safe bowl (for melting chocolate) or a double boiler
- Toothpicks or a dipping fork
How To Make Butterfinger Balls
Creating these delightful Butterfinger Balls is a straightforward process, perfect for gathering family around to make sweet memories. Follow these steps carefully to ensure a perfect batch every time.

- Cream the Base: In a medium bowl, combine the creamy peanut butter and softened unsalted butter. Use an electric mixer on medium speed to beat them together until the mixture is light, smooth, and well combined. This initial step creates a wonderfully creamy foundation.
- Add Vanilla: Stir in the pure vanilla extract. Blend it until it is fully incorporated into the peanut butter and butter mixture. The vanilla adds a warm, aromatic depth to the flavor.
- Incorporate Sugar: Gradually add the powdered sugar to the bowl in batches. Blend on low speed to avoid a cloud of sugar. Make sure to scrape down the sides of the bowl occasionally with a spatula to ensure all ingredients are thoroughly mixed and no dry pockets remain.
- Fold in Crunch: Gently stir in the graham cracker crumbs and the crushed Butterfinger bars. Mix until just combined, being careful not to overmix. You want the texture to be uniform but still have those delightful candy pieces distributed throughout.
- Prepare Baking Sheet: Line a large cookie sheet with parchment paper or wax paper. This prevents the balls from sticking and makes for easy transfer after dipping.
- Scoop and Roll: Using a 1 to 1.5-tablespoon cookie scoop, portion out the dough. Roll each portion into a smooth, compact ball between the palms of your hands. Place the rolled balls onto the prepared baking sheet, leaving a little space between each one.
- Chill Thoroughly: Transfer the baking sheet with the rolled balls to the freezer for about 30 minutes. Chilling is crucial as it helps the balls firm up, making them easier to dip and ensuring they hold their shape perfectly when coated in chocolate.
- Melt Chocolate: After the balls have chilled, melt your chocolate bark or melting wafers. Place the chocolate in a microwave-safe bowl and heat it in 30-second intervals at 50% power. Stir thoroughly between each interval. Remove the bowl from the microwave when there are still a few small chunks of chocolate left, then continue stirring until the residual heat melts it completely smooth. This prevents overheating and keeps the chocolate from seizing.
- Dip the Balls: Using a toothpick or a dipping fork, carefully dip each chilled peanut butter ball into the melted chocolate. You can fully coat them or leave a small portion of the peanut butter mixture showing at the bottom.
- Allow Drip: Gently tap off any excess chocolate by lightly tapping the toothpick or fork against the side of the bowl. This ensures a thin, even coating and prevents chocolate puddles at the base.
- Garnish Immediately: While the chocolate is still wet, immediately sprinkle your chosen garnishes over the dipped balls. This could be additional crushed Butterfingers, festive holiday sprinkles, or a delicate pinch of flaky sea salt for a contrasting flavor.
- Set and Enjoy: Return the garnished Butterfinger Balls to the parchment-lined baking sheet. Allow the chocolate to set completely at room temperature or in the refrigerator for quicker setting. Once firm, they are ready to be enjoyed!

Pro Tips & Troubleshooting
Ensuring your no-bake Butterfinger treats turn out perfectly every time involves a few simple tricks and knowing how to handle common issues.
- Melting Chocolate: Always melt chocolate gently over low heat or in short microwave bursts. Overheating chocolate makes it seize, turning it thick and unusable. If it starts to seize, add a teaspoon of coconut oil or vegetable shortening and stir vigorously to try and revive it.
- Tempering Chocolate: For a professional, glossy finish with a firm snap, especially if using chocolate chips or bars, consider tempering. Understanding the science behind tempering chocolate can help achieve a stable crystal structure, preventing bloom and ensuring a beautiful shine. This isn’t necessary for chocolate bark or wafers, which are designed to melt easily.
- Dipping Technique: Use a fork or toothpick to dip for a cleaner process. For a full coating, drop the ball in, spoon chocolate over it, then lift. Tap gently to remove excess.
- Crushing Candy: A food processor creates uniformly fine Butterfinger crumbs quickly. If crushing by hand, place bars in a sturdy freezer bag and use a rolling pin to break them down into varying textures for added interest.
- Mixture Consistency: If your peanut butter mixture seems too sticky, gradually add a little more powdered sugar until it’s pliable and easy to roll. If it feels too dry or crumbly, a tiny bit more peanut butter can help bring it together.
- Working Cleanly: Keep a damp cloth handy to wipe your hands between rolling balls or after dipping. This helps prevent chocolate smudges and keeps your work area neat.

Serving, Storage, & Variations
These delightful Butterfinger Balls are versatile, perfect for sharing and easy to keep fresh. They are a wonderful addition to any dessert spread or a thoughtful gift.
- Serving Suggestions: Arrange your finished no-bake Butterfinger treats beautifully on a platter for an impressive dessert display. They pair wonderfully with a warm cup of coffee or a cold glass of milk, making them ideal for an after-dinner indulgence or a afternoon snack.
- Storage: Store these delectable Butterfinger Balls in an airtight container in the refrigerator. Layer them with parchment paper between layers to prevent them from sticking together. They will maintain their freshness and delicious taste for up to 3-4 weeks.
- Freezing: For longer enjoyment, these no-bake candy balls freeze beautifully. Place them in a single layer on a baking sheet to freeze solid, then transfer them to freezer-safe bags or containers. They can be frozen for 5-6 months.
- Thawing: When ready to enjoy frozen Butterfinger treats, simply let them thaw at room temperature for about 30 minutes, or overnight in the refrigerator for a gradual thaw.
- Flavor Variations: Get creative! Try substituting Butterfinger with other crushed candy bars like Heath bars for a toffee crunch, Snickers for a caramel-nut twist, or even Oreos for a cookies-and-cream vibe.
- Topping Variations: Beyond crushed candy, consider drizzling your dipped peanut butter balls with white chocolate, dark chocolate, or caramel sauce. Festive sprinkles can add a seasonal touch, while chopped nuts provide extra texture.

Nutrition Information
Understanding the nutritional content of these indulgent Butterfinger Balls helps you enjoy them mindfully. This information is an estimate based on the ingredients and serving size.
| Nutrient | Amount |
|---|---|
| Serving Size | 1 ball |
| Calories | 219 kcal |
| Carbohydrates | 23 g |
| Protein | 3 g |
| Fat | 13 g |
| Saturated Fat | 6 g |
| Polyunsaturated Fat | 2 g |
| Monounsaturated Fat | 4 g |
| Trans Fat | 0.1 g |
| Cholesterol | 6 mg |
| Sodium | 108 mg |
| Potassium | 89 mg |
| Fiber | 1 g |
| Sugar | 18 g |
| Vitamin A | 70 IU |
| Calcium | 11 mg |
| Iron | 0.4 mg |
Frequently Asked Questions (FAQ)
You’ve got questions, we’ve got answers! Here are some common inquiries about making and enjoying these Butterfinger Balls.
How long do Butterfinger Balls last?
Store your delicious Butterfinger Balls in an airtight container in the refrigerator for 3-4 weeks. Layer them with parchment paper to prevent sticking and maintain their freshness.
Can Butterfinger Balls be frozen?
Yes, absolutely! You can freeze these no-bake treats for up to 5-6 months. Thaw them at room temperature or overnight in the fridge before serving.
What kind of peanut butter is best?
Creamy, regular peanut butter is strongly recommended for the ideal texture. Natural peanut butter can be used, but you might need to add a bit more graham cracker crumbs to adjust the consistency.
Is tempering chocolate necessary?
Tempering chocolate is not necessary if you use chocolate bark or melting wafers, as they set smoothly. However, if using chocolate chips or baking bars, tempering will give a superior glossy and firm finish.
Can I make these dairy-free?
Certainly! You can easily adapt this recipe to be dairy-free. Simply use a high-quality dairy-free butter alternative and choose dairy-free chocolate for dipping.
Final Thoughts
These irresistible no-bake Butterfinger Balls truly are a testament to the joy of simple cooking, bringing together classic flavors in an easy-to-make treat. Their delightful crunch and creamy peanut butter core make them a memorable favorite for all ages. Whether you’re honoring family memories or creating new ones, this recipe is perfect for any sweet craving or gathering. We wholeheartedly encourage you to try these delicious no-bake candy balls and share the happiness they bring!

Irresistible No-Bake Butterfinger Balls Recipe
Ingredients
Equipment
Method
- Combine peanut butter and softened butter in a medium bowl and beat with an electric mixer until well mixed.
- Stir in the vanilla extract until fully combined.
- Gradually add powdered sugar in batches, blending on low speed and scraping the sides occasionally.
- Gently stir in the graham cracker crumbs and crushed Butterfingers.
- Line a large cookie sheet with parchment paper and scoop out 1 to 1½ tablespoons of the dough.
- Roll the dough into smooth balls and place them on the prepared baking sheet.
- Chill the balls in the freezer for about 30 minutes to firm them up completely.
- Melt the chocolate in a microwave-safe bowl in 30-second intervals at 50% power, stirring between each interval until smooth.
- Dip each chilled ball into the melted chocolate, coating them fully or partially.
- Immediately sprinkle with additional crushed Butterfingers, holiday sprinkles, or flaky sea salt.
- Allow the chocolate to set completely before serving and enjoying.
Notes

Hi there, I’m chef living in New York City. Every morning, I wake up to the sounds of my little one’s laughter and the comforting routine of preparing breakfast for my family my husband, our child, and my beloved mother, who’s become both my rock and my inspiration since my father passed away. As the only daughter left in our family, I feel a deep responsibility to carry on his memory whenever I step into the kitchen.
- Dominique

- Dominique
- Dominique
- Dominique