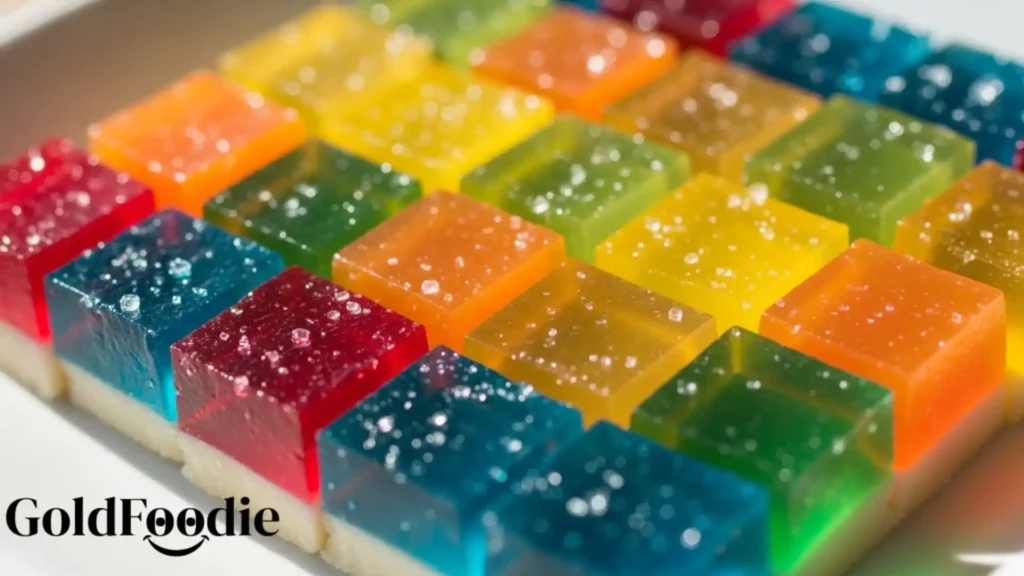
Discover the vibrant, jiggly delight of Finger Jello! This classic treat offers sweet, fruity flavors and a uniquely firm texture, perfect for little hands. Finger Jello is wonderfully easy to prepare, promising smiles and pure joy. Embrace this nostalgic comfort food, ideal for any family occasion.
Table of Contents
Why You’ll Love This Recipe
- Pure Joy: This Finger Jello brings instant happiness with its fun, wobbly texture.
- Effortless Creation: Minimal ingredients, straightforward steps; a quick treat.
- Healthier Indulgence: Use sugar-free gelatin for a delightful, mindful Finger Jello.
- Versatile Fun: Perfect snack, party favor, or colorful addition.

Ingredients You’ll Need
Creating beautiful, flavorful Finger Jello begins with selecting the right ingredients. Quality truly matters here, not just for taste but for that perfect, firm-yet-tender consistency we all adore. Remember, cooking with love means choosing well, just like my grandmother always said.
This recipe primarily relies on flavored gelatin, unflavored gelatin, and water. Simple components, yet they combine to make something truly magical and memorable for your family.
- Flavored Gelatin (3 oz boxes): Choose your favorite vibrant colors and flavors. Raspberry, cherry, lime, and orange are always big hits in our home. Each color layer brings a new dimension of fun to the Finger Jello.
- Unflavored Gelatin (1 oz box): This is the secret to getting that perfect firm texture that makes Finger Jello so wonderfully easy to pick up and enjoy. It provides the structural integrity needed for this unique treat.
- Boiling Water: Essential for dissolving the gelatin thoroughly and creating a smooth base. Ensure it’s truly boiling for the best results.
- Cold Water: Used to cool down the mixture and achieve the right consistency before setting.
- Sweetener (Optional): If using unsweetened or sugar-free flavored gelatin, a touch of honey, maple syrup, or a natural sugar substitute can balance the flavors beautifully for your Finger Jello.
Gathering these simple ingredients is the first step towards a delightful Finger Jello experience. Each component plays a crucial role in delivering that beloved taste and texture that brings back so many fond memories.

Substitutions & Variations
Part of the joy of cooking is experimenting, and Finger Jello is wonderfully forgiving when it comes to healthy swaps and creative twists. My family loves to try new combinations, making each batch of Finger Jello a unique experience. You can easily adapt this recipe to suit different dietary needs or simply explore new flavor profiles while keeping it wholesome. Remember, adapting recipes thoughtfully makes them even more special.
- Sugar-Free Gelatin: For a lighter option, readily substitute regular flavored gelatin with sugar-free varieties. The taste remains fantastic, making this Finger Jello a guilt-free indulgence.
- Natural Fruit Juice: Replace some or all of the cold water with 100% natural fruit juice (like apple, white grape, or cranberry) for an extra layer of fruit flavor and natural sweetness in your Finger Jello. This adds a lovely depth.
- Gelatin Layers with Fruit: Once your first layer of Finger Jello is partially set, gently arrange thinly sliced fresh fruit, such as berries or mandarin segments, before pouring the next layer. This adds visual appeal and a refreshing burst of real fruit.
- Coconut Water Base: Instead of cold water, consider using coconut water for a subtle tropical twist and added electrolytes. This creates a beautifully refreshing Finger Jello.
- Herbal Infusions: For a sophisticated touch, steep some fragrant herbs like mint or lavender in the hot water before adding the gelatin. Strain the herbs out before mixing for a delicately flavored Finger Jello.
- Natural Food Coloring: If using unflavored gelatin and fruit juice, a tiny drop of natural food coloring (from beet, spirulina, or turmeric) can create vibrant, eye-catching hues for your Finger Jello without artificial dyes.
These variations prove that Finger Jello can be both delicious and health-conscious. Feel free to get creative and tailor this classic treat to your family’s preferences and dietary needs, always ensuring the same delightful Finger Jello experience.
Note: This video is for demonstration purposes and may use a slightly different methode.
If you’re experimenting with your Finger Jello, try making these delicious No-Bake Butterfinger Balls for a sweet treat that complements the jiggly fun perfectly. Each bite brings a new layer of flavor that your family will adore!
Equipment You’ll Need
Having the right tools simplifies the process and ensures your Finger Jello turns out perfectly every time. You don’t need fancy gadgets; just a few basic kitchen essentials will do the trick. Gathering these items beforehand makes the entire cooking process smooth and enjoyable, allowing you to focus on the joy of creating this beloved Finger Jello.
- Large Mixing Bowls (2-3): Essential for dissolving the gelatin and mixing ingredients. Having a few allows for different colors if you’re making multiple layers of Finger Jello.
- Measuring Cups and Spoons: Accuracy in measurements is key for the ideal Finger Jello consistency.
- Whisk: For thoroughly combining the gelatin powders with water, ensuring no lumps remain in your Finger Jello mixture.
- Rectangular Baking Pan (9×13 inch or similar): This is the perfect size for pouring and setting your Finger Jello layers. A glass or ceramic dish works wonderfully.
- Sharp Knife or Cookie Cutters: Once your Finger Jello is set, these tools help you cut it into those iconic, easy-to-handle shapes. Cookie cutters add extra fun!
- Spatula or Ladle: For carefully pouring the gelatin mixture into the pan and scraping down bowls.
- Plastic Wrap or Lid: To cover the pan while the Finger Jello chills in the refrigerator, preventing it from absorbing odors or drying out.
With these simple tools, you are well-equipped to embark on your Finger Jello making adventure, ensuring a smooth and delightful culinary journey from start to finish.
Step-by-Step Instructions
Creating Finger Jello is a delightful process, much like building a treasured family memory layer by layer. Follow these steps carefully, and you’ll achieve that perfect jiggly, firm texture that makes Finger Jello so uniquely wonderful. Take your time, enjoy each stage, and anticipate the smiles this treat will bring.

- Prepare Your Pan: Lightly grease a 9×13 inch rectangular baking pan with a tiny amount of neutral oil (like grapeseed or coconut oil) if you want to ensure easy removal. Alternatively, line it with parchment paper for effortless lifting of the set Finger Jello.
- Bloom the Unflavored Gelatin: In a medium bowl, sprinkle the unflavored gelatin powder over 1 cup of cold water. Let it sit for 5-10 minutes. This “blooming” process helps the gelatin dissolve more smoothly later, creating a consistent Finger Jello base.
- Dissolve the Flavored Gelatin: In a separate large bowl, empty one package of flavored gelatin powder. Pour 1 cup of boiling water over it, whisking continuously until the powder is completely dissolved and no granules remain. This is crucial for a clear, vibrant Finger Jello.
- Combine Gelatins for the First Layer: Add half of your bloomed unflavored gelatin mixture to the bowl with the dissolved flavored gelatin. Stir gently until completely combined. This combination ensures your Finger Jello achieves its signature firm texture.
- Pour the First Layer: Carefully pour the mixture into your prepared baking pan. Place the pan in the refrigerator and chill for 15-20 minutes, or until the Finger Jello is firm but still slightly sticky to the touch. It should not be fully solid yet.
- Repeat for Subsequent Layers: While the first layer chills, repeat steps 3-5 for each additional color of Finger Jello you wish to make. For each new layer, ensure the previous layer is set enough to support the new liquid without mixing, but not so firm that the layers won’t adhere. Patience is key for beautifully distinct Finger Jello layers.
- Chill Completely: Once all your layers are poured, cover the pan loosely with plastic wrap. Return the Finger Jello to the refrigerator and chill for at least 3-4 hours, or preferably overnight, until it is completely firm and set.
- Cut and Serve: Once thoroughly chilled, use a sharp knife or fun cookie cutters to cut the Finger Jello into desired shapes. Gently lift the pieces from the pan using a thin spatula. Arrange them on a platter and watch them disappear!
Making Finger Jello is a true labor of love, and the result is always worth the effort. Enjoy the vibrant colors and delightful texture of your homemade Finger Jello!
As you prepare your Finger Jello, don’t forget to check out these delightful Strawberry Cake Truffles which pair wonderfully with the jellied layers. The combination is sure to create cherished memories for everyone!
Pro Tips for Success
Achieving perfectly set, beautifully layered Finger Jello isn’t just about following steps; it’s about understanding a few technical nuances that can elevate your creation. My own cooking journey taught me that small details make a big difference, especially with something as delicate as Finger Jello. These tips will help you create a masterpiece that everyone will rave about.

- Boiling Water Temperature: Always use truly boiling water. The heat ensures the gelatin powder dissolves completely, preventing any grainy texture in your Finger Jello. Just off the boil is ideal.
- Even Layers: For distinct, beautiful layers, ensure each layer is firm enough to support the next, but not fully set. If a layer is too firm, the next layer won’t adhere properly, and your Finger Jello might separate. Test by gently touching the surface; it should feel slightly sticky.
- Cooling Between Layers: Rapid chilling in the freezer for 5-7 minutes can speed up setting time between layers, but watch it carefully. Over-chilling can make the layers less likely to bond. For best results, stick to the refrigerator.
- Clean Cuts: For perfectly clean cuts, use a warm, sharp knife. Dip the knife in hot water, wipe it dry, and then slice through the Finger Jello. Repeat this process for each cut. For cookie cutters, dip them in warm water as well.
- Avoid Over-Stirring: Once the gelatin is dissolved, avoid excessive stirring. Over-stirring can introduce air bubbles, making your Finger Jello appear cloudy rather than crystal clear.
- Accurate Measurements: Precision in water measurements is critical. Too much liquid results in a softer, less firm Finger Jello that might not hold its shape, while too little can make it overly stiff.
- Patience is a Virtue: Give your Finger Jello ample time to set. Rushing the chilling process leads to a soft, gooey texture rather than the desired firm, sliceable consistency. Overnight chilling truly yields the best Finger Jello.
By implementing these pro tips, your Finger Jello will not only taste incredible but also boast that perfect, beautiful presentation that always impresses.
Storage & Reheating Tips
Proper storage ensures your delightful Finger Jello remains fresh, firm, and ready to enjoy for days, preserving its vibrant flavors and fun texture. Since Finger Jello is a chilled dessert, “reheating” isn’t a concern; instead, the focus is on maintaining its cool, refreshing quality. Handling it with care helps keep its shape and appeal, much like preserving a cherished family recipe.

- Airtight Container: Store leftover Finger Jello in an airtight container in the refrigerator. This prevents it from drying out, absorbing refrigerator odors, and helps maintain its vibrant color and flavor.
- Layer with Parchment Paper: If stacking multiple pieces of Finger Jello, place a sheet of parchment paper between layers to prevent them from sticking together. This makes serving much easier.
- Best Enjoyed Chilled: Finger Jello is best served cold. Ensure it remains in the refrigerator until just before serving for the optimal firm, refreshing experience.
- Shelf Life: Properly stored Finger Jello can last for up to 5-7 days in the refrigerator. After this time, the texture may start to degrade, becoming less firm.
- Avoid Freezing: Do not freeze Finger Jello. Freezing will ruin its texture, making it watery and grainy upon thawing. Its unique consistency relies on being served chilled, not frozen.
- Separate Flavors: If you’ve made various flavors of Finger Jello, consider storing them in separate containers if you want to maintain distinct flavor profiles, though mixed flavors are also delightful.
By following these simple storage tips, you can extend the joy of your homemade Finger Jello, ensuring every piece is as perfect as the first.
Proper storage is key to enjoying your Finger Jello for days, almost like how you’d keep a batch of Orange Jalapeno Jelly fresh and flavorful. Ensure it’s in an airtight container to maintain that perfect wobbly texture!
What to Serve With This Recipe
While Finger Jello shines brightly on its own as a delightful snack or dessert, pairing it with complementary, healthy options can elevate the entire experience. It’s about creating balance and offering a complete, nourishing moment, a principle I’ve always held dear in my own family kitchen. Think of accompaniments that enhance its fruity notes and light texture, making it part of a wholesome spread.
- Fresh Fruit Platter: A vibrant array of seasonal fresh fruits like berries, melon slices, grapes, or kiwi complements the Finger Jello beautifully, adding more natural sweetness and essential vitamins.
- Light Yogurt Dip: A dollop of plain Greek yogurt, perhaps sweetened with a touch of honey or vanilla, makes a creamy, protein-rich dip that contrasts wonderfully with the Finger Jello’s firm texture.
- Homemade Granola or Seed Mix: For a delightful textural contrast, offer a small bowl of crunchy homemade granola or a mix of pumpkin and sunflower seeds. This adds fiber and healthy fats.
- Herbal Iced Tea: A refreshing glass of unsweetened herbal iced tea (like mint or hibiscus) provides a sophisticated, healthy beverage pairing that cleanses the palate after enjoying your Finger Jello.
- Small Salad with Citrus Vinaigrette: For a truly balanced meal, a small side salad with mixed greens, a few nuts, and a light citrus vinaigrette can precede the Finger Jello, creating a refreshing sequence of flavors.
- Cottage Cheese: A serving of cottage cheese offers a good source of protein, creating a satisfying and balanced snack when paired with the sweet, fruity Finger Jello.
These pairings ensure that enjoying Finger Jello can be part of a thoughtful, healthy eating plan, making it not just a treat, but a well-rounded culinary moment for your loved ones.
Frequently Asked Questions (FAQ)
Can I use fruit juice instead of water for Finger Jello?
Absolutely! Using fruit juice instead of cold water (or even partially replacing the boiling water if the juice is hot) is a fantastic way to enhance the fruity flavor of your Finger Jello. White grape, apple, or cranberry juice work wonderfully.
Just ensure your juice is 100% pure and doesn’t contain enzymes that might prevent gelatin from setting, like fresh pineapple or kiwi juice. Processed versions of these are usually fine, but always check labels.
Why is my Finger Jello not setting properly?
Several factors can cause your Finger Jello to not set. The most common reasons include not using enough unflavored gelatin, not using truly boiling water to dissolve the gelatin completely, or not chilling it for a long enough duration. Ensure your water measurements are precise and give your Finger Jello at least 3-4 hours, or preferably overnight, in the refrigerator to fully firm up. Humidity can also play a minor role, so keep it covered.
How can I make Finger Jello more visually appealing for parties?
To make your Finger Jello pop for any occasion, consider using a variety of vibrant colors for distinct layers, perhaps even creating a rainbow effect. Use fun cookie cutters to make shapes like stars, hearts, or animals. You can also embed small pieces of fresh fruit (like blueberries or thin orange slices) into the layers as they partially set. A sprinkle of edible glitter on top just before serving adds a magical touch, making your Finger Jello a real showstopper.
Finger Jello, also known as Jello cut into fingers or cubes, is a playful dessert enjoyed by kids and adults alike, often made with colorful flavored gelatin. This treat’s fun texture and vibrant colors make it a popular choice for parties and gatherings, offering a nostalgic taste of childhood.
Final Thoughts
Finger Jello transcends being just a dessert; it’s a vessel for creating cherished family memories, echoing the warmth of shared moments. Its simplicity and vibrant joy remind us of the beauty in homemade treats. As Dominique, I hope this recipe brings as much happiness and connection to your table as it has to mine, becoming a beloved part of your family’s culinary story.
Nutrition Information (per serving)
This estimated nutrition information is based on using regular flavored gelatin and unflavored gelatin, without additional sweeteners. Values will vary with specific brands and any additions.
| Nutrient | Amount (Approx.) |
|---|---|
| Calories | 70-90 kcal |
| Protein | 3-5 g |
| Carbohydrates | 15-20 g |
| Sugars | 15-20 g |
| Fat | 0 g |
| Sodium | 30-50 mg |

Finger Jello
Ingredients
Method
- Prepare your pan by lightly greasing a 9×13 inch rectangular baking pan.
- In a medium bowl, sprinkle the unflavored gelatin over 1 cup of cold water and let it bloom for 5-10 minutes.
- In a separate large bowl, dissolve the flavored gelatin in 1 cup of boiling water by whisking continuously until smooth.
- Combine half of the bloomed unflavored gelatin into the flavored mixture and stir until fully combined.
- Pour the mixture into the prepared baking pan and chill for 15-20 minutes until sticky but firm.
- Repeat for additional layers if desired, ensuring each previous layer is firm enough to support the next.
- After all layers have been added, cover loosely with plastic wrap and chill in the refrigerator for at least 3-4 hours, or preferably overnight.
- Once set, use a sharp knife or cookie cutters to cut into desired shapes and serve.
Notes

Hi there, I’m chef living in New York City. Every morning, I wake up to the sounds of my little one’s laughter and the comforting routine of preparing breakfast for my family my husband, our child, and my beloved mother, who’s become both my rock and my inspiration since my father passed away. As the only daughter left in our family, I feel a deep responsibility to carry on his memory whenever I step into the kitchen.
- Dominique

- Dominique
- Dominique
- Dominique